The color of the scarf is completely wrong. We'll use ColorReplace to change the color, and we'll animate the brightness to match the lighting variations in the images.
1. | Select Move2D1 and insert a ColorReplace node from the Color tab.
ColorReplace allows you to isolate a color according to its hue, saturation, and value, and replace it with a different color. Other areas of the spectrum will remain unchanged.
 |
2. | Make sure your Update mode is set to Always.
 The Always Update mode will make it easier to choose the replacement color.
|
3. | Also, make sure that your Time Bar is still set to frame 48.
|
4. | Click the SourceColor swatch and drag over an area of the scarf.
 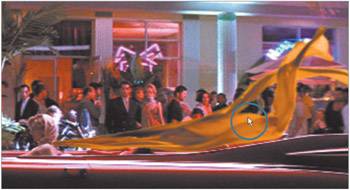 |
5. | Now click the ReplaceColor swatch and drag over the woman's shoulder until the color of the scarf matches that of the woman's dress.
  As you drag on the woman's shoulder, the color of the scarf updates interactively because of the Always Update mode. The remaining gold areas on the scarf need to be tuned out.
|
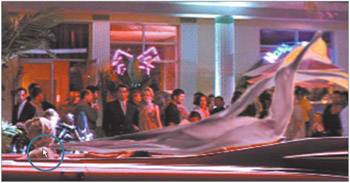
6. | Drag the satFalloff slider to about 0.6. The scarf will turn completely pink.
Now that we have a good color match, we can move on to correcting the brightness.
|
7. | Set the Update mode to Release and drag the Time Bar to frame 1.
Look at the difference in brightness between the woman's head and the scarf.
|
8. | Go to frame 15.
By frame 15, the brightness of the scarf has normalized. Using an Expand node and a few keyframes, you'll animate the scarf's brightness.
|
9. | Switch from the Color Picker to the Node View.
 |
10. | Go back to frame 1 and, from the Color tab, add an Expand node after Color Replace1.
 Expand increases the amount of pure black and white in the image.
|
11. | Activate the High Color keyframe icon.
 The High Color parameter will increase the whites in the image.
|
12. | Press the V key and drag left over the HighColor parameter until all three values show 0.25. You may need to make repeated drags.
All right, it looks like hell. The scarf matches where it connects to the woman's neck, but the rest of it is blown out. A little masking is in order.
|
13. | From the Mask Create pull-down menu, choose RGrad.
 An RGrad is automatically created and connected to the Mask input of the Expand1 node.
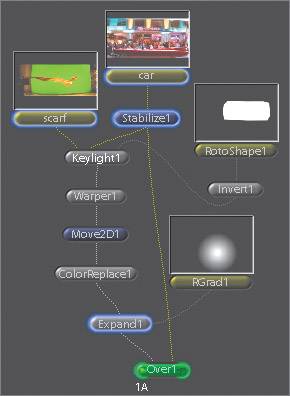 |
14. | Position the crosshairs over the woman's head and adjust the inner and outer circle onscreen controls to limit the effect of the Expand1 node.
I set the radius to 20 and the falloffRadius to 155.
|
15. | Go to frames 8, 10, and 15 and drag while pressing the V key until the scarf's brightness matches on each of these frames.
I used the following values:
Frame | Value |
|---|
1 | .25 | 8 | .30 | 10 | .40 | 15 | .80 |
|
16. | Make a flipbook.
 Everything is finished except for restoring the original motion of the car clip.
|
17. | Close the flipbook.
|