Chapter 10: Organizing and Formatting Project Details
![]() Download CD Content
Download CD Content
In this chapter you will learn to:
-
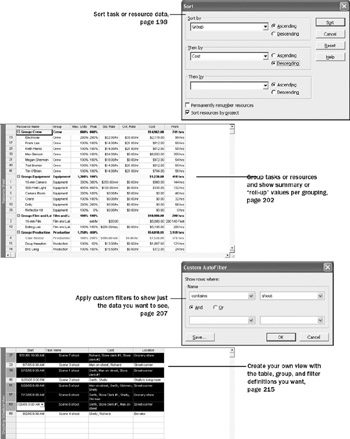
Sort task and resource data.
-
Display task and resource data in groups.
-
Filter or highlight task and resource data.
-
Create a custom table.
-
Create a custom view.
See Also Do you need a quick refresher on the topics in this chapter? See the quick reference entries on pages xxxi–xxxii.
After you’ve built a project plan, chances are you will need to examine specific aspects of it for your own analysis or to share with other stakeholders. Although the built-in views, tables, and reports in Microsoft Office Project 2003 provide many ways to examine a project plan, you might need to organize information to suit your own specific needs.
In this chapter, you use some of the formatting tools in Project to change the way your data appears. Project includes powerful features that enable you to organize and analyze data that otherwise would require separate tools, such as a spreadsheet application.
| Important | On the CD Before you can use the practice files in this chapter, be sure you install them from the book’s companion CD to their default location. See “Using the Book’s CD-ROM,” on page xiii, for more information. |
Sorting Project Details
Sorting is the simplest way to reorganize task or resource data in Project. You can sort tasks or resources by predefined criteria, or you can create your own sort order with up to three levels of nesting. For example, you can sort resources by resource group and then sort by cost within each resource group.
Like grouping and filtering, which you will work with in later sections, sorting does not (with one exception) change the underlying data of your project plan; it simply reorders the data you have. The one exception is the option it offers to renumber task or resource IDs after sorting. After tasks or resources are renumbered, you cannot restore their original numbered sequence.
However, it’s fine to permanently renumber tasks or resources if that’s what you intend to do. For example, when building a resource list, you might enter resource names in the order in which the resources join your project. Later, when the list is complete, you might want to sort them alphabetically by name and permanently renumber them.
Each resource in the Short Film Project plan is assigned to one of several resource groups. These groups have names like Crew, Production, Talent, and other names that make sense in a film production company. For your project plans, you might use resource groups to represent functional teams, departments, or whatever most logically describes collections of similar resources.
Sorting all resources by resource group enables you to see more easily the costs associated with each resource group. This can help you plan your project’s budget. You can also sort resources within each group by cost from most to least expensive.
In this exercise, you sort a resource view.
| Important | If you are running Project Professional, you may need to make a one-time adjustment to use the My Computer account and to work offline. This helps ensure that the practice files you work with in this chapter don’t affect your Project Server data. For more information, see “Starting Project Professional,” on page 10. |
OPEN: Short Film Project 10a from the \My Documents\Microsoft Press\Project 2003 Step by Step\Chapter 10 Advanced Formatting folder. You can also access the practice files for this book by clicking Start, All Programs, Microsoft Press, Project 2003 Step by Step, and then selecting the chapter folder of the file you want to open.
-
On the File menu, click Save As.
The Save As dialog box appears.
-
In the File name box, type Short Film Project 10, and then click the Save button.
-
On the View menu, click Resource Sheet.
The Resource Sheet view appears. By default, the Entry table appears in the Resource Sheet view; however, the Entry table does not display the cost field per resource. You will switch to the Summary table instead.
-
On the View menu, point to Table: Entry, and then click Summary.
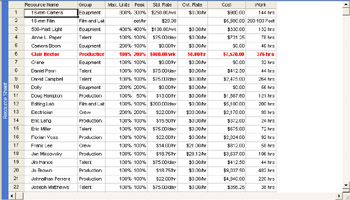
The Summary table appears. Your screen should look similar to the following illustration:
Now you are ready to sort the Resource Sheet view.
-
On the Project menu, point to Sort, and click Sort By.
The Sort dialog box appears.
-
Under Sort By, click Cost in the drop-down list, and next to that, click Descending.
-
Make sure that the Permanently renumber resources check box is cleared:
Important The Permanently renumber resources (or when in a task view, the Permanently renumber tasks) check box in the Sort dialog box is a Project-level (that is, application) setting; if selected, it permanently renumbers resources or tasks in any Project plan in which you sort. Because you might not want to permanently renumber resources or tasks every time you sort, it’s a good idea to clear this check box.
-
Click the Sort button.
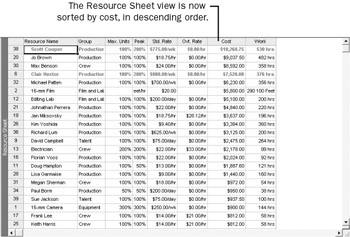
The Summary table in the Resource Sheet view is sorted by the Cost column, in descending order. Your screen should look similar to the following illustration:
This arrangement is fine for looking at resource costs in the entire project, but perhaps you’d like to see this data organized by resource group. To see this, you’ll apply a two-level sort order.
Tip When you sort data, the sort order applies to the active view, regardless of the specific table currently displayed in the view. For example, if you sort the Gantt Chart view by start date while displaying the Entry table and then switch to the Cost table, you’ll see the tasks sorted by start date in the Cost table.
-
On the Project menu, point to Sort, and then click Sort By. the drop-down list, and next to that, click Descending.
-
Make sure that the Permanently renumber resources check box is cleared.
Your screen should look similar to the following illustration:
-
Click the Sort button.
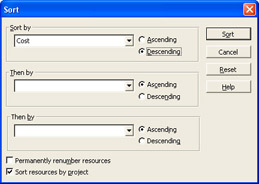
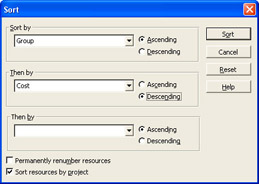
The Sort dialog box appears. In it, you can apply up to three nested levels of sort criteria.
-
Under Sort By, click Group in the drop-down list, and next to that, click Ascending.
Tip You can sort by any field, not just the fields visible in the active view.
-
Under Then By (in the center of the dialog box), click Cost in
Project sorts the Resource Sheet view to display resources by group (Crew, Equipment, and so on) and then by cost within each group. Your screen should look similar to the following illustration:
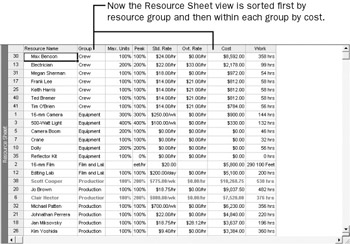
This sort offers an easy way to identify the most expensive resources in each resource group working on the short film project.
To conclude this exercise, you’ll re-sort the resource information to return it to its original order.
-
On the Project menu, point to Sort, and then click By ID.
Project re-sorts the resource list by resource ID.
Note that there is no visual indication that a task or resource view has been sorted other than the order in which the rows of data appear. You cannot save custom sort settings that you have specified, as you can with grouping and filtering. However, the sort order you most recently specified will remain in effect until you re-sort the view.
EAN: 2147483647
Pages: 199