| A mask allows you to hide and reveal parts of the Stage based on some shape that you draw. It's a lot like a mat in a picture frame, giving you a glimpse of the image beneath itbut only the interesting part, while everything else is hidden. Using a mask can be very powerful because masks can create some amazing and complex effects. Masks can remain stationary on the Stage, or you can animate them so they move around. The mask effect is really a layer property, and is achieved by setting one layer to be a masking layer, and setting another layer to be masked by it. Flash will do this first step for you. In this exercise, you will create a basic shape to mask an area of the Stage. The menus will be animated to drop down below the three buttons that are used to control them when you construct that part of the interface. The mask that you will create will ensure that menus are visible only in an area below where the buttons will be. You should still be using bookstore5.fla for this exercise. 1. | Add guides to the main Stage by dragging guide lines from the horizontal and vertical rulers.
As this point, you should have a long rectangle on the Stage, but it is not properly put in place. For now, simply drag the graphic off the Stage to the workspace. Repeat this procedure for the other graphics you have on the Stage, such as the oval you created earlier in the lesson for the glow animation. You need to create some new guide lines in the same way you created them in the previous exercise. First, make sure that your guides are not locked. Remember, you can lock and unlock guides in View > Guide > Lock Guides. Next, drag a vertical guide to 115 pixels and a second vertical guide to 405 pixels. Drag a horizontal guide down to 125 pixels and a second horizontal guide down to 140 pixels.
| 2. | Create a rectangle on a new layer and then change the layer to a mask.
Select the background layer and then insert two new layers. Name the lower layer menu and the layer above it mask. On the mask layer, create a rectangle within the guide lines. The edges snap to the guides.
When you finish creating the rectangle, select the mask layer in the Timeline. Right- or Control-click the layer name, and select Mask from the contextual menu. The menu layer is automatically indented in the Layers pane, which means it is now being masked.
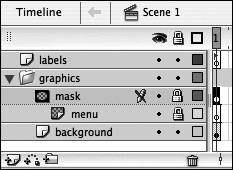 | 3. | Ensure that the mask layer is locked and remove the guides.
By default, when you produce a mask in Flash, the mask layer and the layer being masked automatically lock. This causes the mask to work properly in the editing environment. When you unlock either layer, the mask graphic will become visible again, so either the content of the masked layer can be repositioned or the content of the masking layer itself can be reshaped. Even with those layers locked, however, if you test the movie (Control > Test Movie, Ctrl+Enter or Cmd+Enter on OS X), the mask will still behave as expected. It is unnecessary to test the movie at this point because you have no content yet on the layer being masked.
Ensure that the mask layer is locked. In addition, set the mask layer to be hidden by clicking the dot underneath the Show/Hide All Layers icon for the layer. Finally, because you won't need the guides for now, select View > Guides > Clear Guides to quickly put them back in the ruler.
|
|