| In the following exercise, you will create a questionnaire that users will fill out and send to the server by clicking a button. This questionnaire uses several new components not yet covered in this lesson. Because Flash installs many default user interface components, it is very easy to create forms such as these and have them working in no time. You will add ActionScript in Lesson 10 that will collect and send the information out to a server. The NumericStepper is a cool little component that allows your visitors to click through an ordered set of numbers so they can do things like specify how many giant cookies they want to add to their shopping cart (if you're building a website that sells cookies of course. You should. Cookies are delightful). The component is a text field showing a number in a text field that's next to small arrowed buttons. When these buttons are clicked, the numbers either step up or down through the set of numbers. You can set the minimum, the maximum, and the interval amount between each number. The NumericStepper handles only numeric data. The ComboBox allows users to make a selection from a drop-down list (Chocolate Chip, Sugar, or Peanut Butter cookies? Oh to decide.). You can set a ComboBox to editable, which means that instead of making a selection from the menu, a user can type a selection into a text field first or select an option from the menu instead. You can set the text that is displayed in the drop-down list and the associated data for that text and write ActionScript so something occurs when a selection is made. 1. | Open bookstore12.fla if it isn't already open. Duplicate the symbol mcFeedback and name the new symbol mcQuestions. Double-click its type icon in the library to enter symbol-editing mode.
mcQuestions will have the same general structure as mcFeedback. Its Timeline will be the same, its background will be the same, and it will have a send and back button with the same ActionScripts attached to them. Duplicating a symbol creates an exact copy of the symbol in the library. You can edit that copy to focus only on what will change inside the symbol definition and leave the unchanging parts alone. In short, you're saving yourself some time, so you can get back to whatever hokey movie you were watching on television as quickly as you can. Lazy bones.
Duplicate the mcFeedback symbol by right clicking (Control-clicking on OS X) the symbol and choosing Duplicate from the context menu. In the Duplicate Symbol dialog box, name the new symbol mcQuestions. Double-click mcQuestions to enter symbol-editing mode.
| 2. | Change the text Send Us a Message to Questionnaire and delete all the components but the Button component from the Stage.
With the Selection tool, double-click on the text "Send us a message." Change the text to read Questionnaire. Remove the Label, TextInput, and TextArea components from the Stage. Leave the Button component instance where it is.
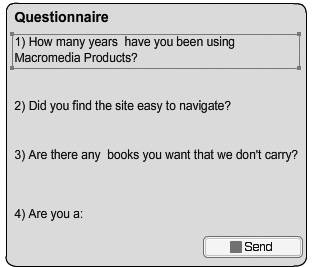
 | 3. | Add text fields to the form layer.
Right-click (or Control-click on OS X) the form layer and choose Lock Others from the context menu. Select the Text tool from the Tools panel and change the text type to Static Text in the Property inspector. Choose Arial for the font, a font size of 12 points, black for the fill color, and set the font rendering method to Anti-alias for readability. With the Text tool still selected, click and drag on the Stage to create a fixed-width text box just under the width of the grBackground graphic symbol. Type in the following text: 1) How many years have you been using Macromedia Products? Don't worry about the position of the text on the Stage right now because you will modify the layout later in this exercise.
Add three more Static text fields to the Stage with the following text: 2) Did you find the site easy to navigate?; 3) Are there any books you want that we don't carry?; and 4) Are you a:
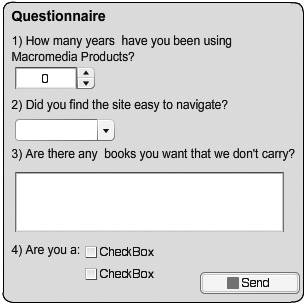
 | 4. | Select the form layer and add the NumericStepper, ComboBox, TextArea, Button and CheckBox components to the Stage.
Select the form layer and maximize the Components panel. Add one instance of the following components to the Stage: NumericStepper, ComboBox, TextArea, Button. Then add two instances of the CheckBox component. Just drag the component from the Components panel onto the form layer, as you did in the previous exercise.
Arrange the component instances so that they appear roughly the same as in the following figure. Resize your text fields if necessary.
 Note Resizing the text field by using the Info panel or Property inspector can lead to text that is distorted. You must use the drag handles for the text field to resize the text field properly. | 5. | Modify the parameters of the NumericStepper component using the Component inspector panel.
Select the NumericStepper component on the Stage using the Selection tool. Position it near the bottom-left corner of the first question. Using the Property inspector, you can modify the following: the maximum and minimum range that can be used in the NumericStepper, the stepSize that controls the amount that the current value will be incremented or decremented when the user presses the up or down button in the component instance, and the value parameter that defines the current or starting value of the component.
Maximize or open the Property inspector, and make sure you have the Parameters tab selected. Set the minimum parameter to 0 and the maximum value to 10.
| 6. | Modify the parameters of the ComboBox component instance on the Stage.
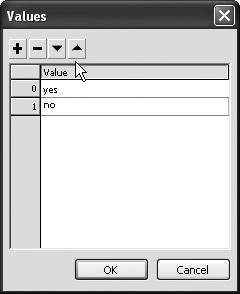
With the ComboBox component selected on the Stage, maximize the Property inspector. Double-click on the data parameter in the Property inspector, and the Values dialog box appears. This is where you can enter new values for the ComboBox component.
Click the plus (+) button at the top of the dialog box twice to add two new values. Change the first value to 1, change the second value to 0, and then press OK to close the dialog box and return to the Stage.
 This time, double-click the label parameter in the Property inspector to open the Values dialog box again. You are adding labels that will correspond to the data values you added earlier. Add two values, change the top value to Yes, change the bottom value to No, and click the OK button to return to the Stage.
 Tip When you are adding values, you must be careful to make sure that the values in the data property correspond to the values in the labels property or your users may experience unexpected results. | 7. | Change the parameters of the CheckBox component instances on the Stage.
Select the CheckBox component on the Stage and change the label parameter to Designer in the Property inspector. Move the second CheckBox component to the right of the Developer check box and change the label to Developer in the Property inspector. If you want to move the label on the other side of the check box, you can use the Property inspector and change the label Placement from right to left.
Note Now that you have placed all the questions on the Stage, you might want to select all the instances along the left side of the rectangle and use the Align panel to line them up with precision. Make sure that the To Stage button is deselected first, so they align to the other instances and not to the left side of the Stage. | 8. | Save your changes.
Because you duplicated the mcFeedback symbol, you do not need to do anything further. The mcFeedback and mcQuestions forms both have send and back buttons that work with the exact same ActionScript. You've already got it from the duplication process, so you don't need to go back and add it again.
In the next exercise, you will set a tab order for the components in the mcFeedback form, and you will also set keyboard focus to tiEmail by default when the form first appears.
|
|