DDL for Handling Database Objects
DDL stands for Data Definition Language. This class of statements allows the user or DBA to add, change, or drop database objects, such as tables, indexes, views, and so forth. While most ordinary users and developers can create their own tables in a development environment, the DBA must still provide a solid infrastructure for these tables by providing the appropriate location and disk space allocation parameters. This will ensure that database tables are created efficiently, regardless of who is creating them.
DDL (Data Definition Language)
Includes statements such as CREATE, ALTER, and DROP to work with objects such as tables. DDL modifies the structure of the objects in a database instead of the contents of the objects.
The following sections introduce the key DDL statements: CREATE, ALTER, DROP, RENAME, and TRUNCATE. For the ALTER, DROP, RENAME, and TRUNCATE DDL operations, the table to be modified must either be owned by the user executing the DDL statement or the user must have the privilege to perform that operation in any schema.
The CREATE Statement
Tables are probably the most frequently created object in the database, second only to indexes (depending on the type of database, as discussed in Chapter 12, “Making Things Run Fast (Enough)”). The basic CREATE TABLE statement has the following syntax:
CREATE TABLE [schema.]tablename (column1 datatype1 [DEFAULT expression] [, ...]);
A schema is a group of related tables and other objects that is owned by a single user, whose username is the same as the schema name. In the context of the CREATE TABLE statement, if the table itself will not be created in the schema of the user executing the CREATE TABLE statement, the schema name must be specified. In addition, the user creating the table must have the correct privileges to create the table in a different schema. (Permissions and privileges are covered in Chapter 11.)
schema
A group of related database objects assigned to a database user. A schema contains tables, views, indexes, sequences, and SQL code. The schema name can be used to qualify objects that are not owned by the user referencing the objects.
At the simplest level, a table must have one or more columns, and each of these columns must be of a specified type: a character string, a numeric type, a date type, a long binary value, and so forth. These columns can all have NULL values, or they can be specified as being required for every row. If the user does not specify a value for a column in an INSERT statement, a DEFAULT value can be specified for this column when the table is created.
It turns out that Scott’s company is going to segregate the part-time employees into a new table. The new table will be very similar to the existing EMP table, except that the new table will have an hourly wage rate instead of a salary and a commission. Starting with the existing structure of the EMP table, we can construct a new CREATE TABLE statement as follows:
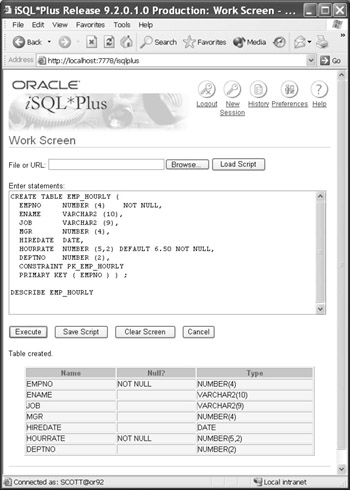
CREATE TABLE EMP_HOURLY ( EMPNO NUMBER (4) NOT NULL, ENAME VARCHAR2 (10), JOB VARCHAR2 (9), MGR NUMBER (4), HIREDATE DATE, HOURRATE NUMBER (5,2) NOT NULL DEFAULT 6.50, DEPTNO NUMBER (2), CONSTRAINT PK_EMP PRIMARY KEY ( EMPNO ) );
Notice that only the employee number and the hourly rate are required fields. In addition, the hourly rate defaults to $6.50 an hour if it is not specified in the INSERT statement. Below are the results of the CREATE TABLE statement in iSQL*Plus, along with a confirmation of the table structure using the iSQL*Plus DESCRIBE command.
The CONSTRAINT and PRIMARY KEY clauses ensure that every table should have one column, or a combination of columns, that makes the table’s row unique within the table. This makes the identification of a row much easier and less ambiguous when you’re doing an UPDATE, a DELETE, or a SELECT operation. You’ll learn more about ensuring unique values in Chapter 10, "Creating and Maintaining Database Objects."
| Tip | You can also use the CREATE TABLE AS SELECT (CTAS) version of CREATE TABLE to quickly create a new version of an existing table, with some or all of the rows from the source table. CTAS is covered in Chapter 10. |
The ALTER Statement
The ALTER statement allows the user to make some kind of change to some object in the database. The ALTER statement’s full syntax is very complex. For the purposes of this book, the ALTER statement will be used to add, delete, or change a column in a table. The ALTER statement syntax can then be simplified to one of three statements:
ALTER TABLE tablename ADD (column1 datatype1 [DEFAULT expression] [, ...]); ALTER TABLE tablename MODIFY (column1 datatype1 [DEFAULT expression] [,...]); ALTER TABLE tablename DROP COLUMN column1;
A new company policy has been implemented at Scott’s company that mandates a new default hourly rate of $7.25. The EMP_HOURLY table must be modified to reflect this new policy. We can use the second form of the ALTER TABLE statement shown above to accomplish this task. It also turns out that there is one manager for all hourly employees; therefore, we do not need a MGR column in the EMP_HOURLY table. We can use the third form of the ALTER TABLE statement shown above to accomplish this additional task.
ALTER TABLE EMP_HOURLY MODIFY (HOURRATE NUMBER(5,2) DEFAULT 7.25); ALTER TABLE EMP_HOURLY DROP COLUMN MGR; DESCRIBE EMP_HOURLY; Table altered. Table altered. Name Null? Type ---------------------------- -------- ---------------- EMPNO NOT NULL NUMBER(4) ENAME VARCHAR2(10) JOB VARCHAR2(9) HIREDATE DATE HOURRATE NOT NULL NUMBER(5,2) DEPTNO NUMBER(2)
If columns are dropped or modified in a table, the values of the other columns in the table, as well as the total number of rows in the table, remain the same. If a new column is added to a table with existing rows, the value for this column in the existing rows is NULL, unless the column is required. If the column is required, a DEFAULT value must be specified when the column is added.
The DROP Statement
When a table is no longer needed, it can be dropped. Both the table definition and the rows in the table are dropped, and the space allocated for the table is made available for other database objects. The syntax for the DROP statement is about as simple as it gets:
DROP TABLE tablename;
The HR department at Scott’s company was maintaining the list of retirees in an EMP_RETIRED table. Once the new management came in a couple of months ago, the retiree-tracking function was outsourced, so the EMP_RETIRED table is no longer needed. Here is how it is dropped:
DROP TABLE EMP_RETIRED; Table dropped.
As with most other DDL operations, the table to be dropped either must be owned by the user executing the DROP statement or the user must have the privilege to drop a table in any schema.
The RENAME Statement
The RENAME statement is also very straightforward. A table name can be changed to another name; references by other database objects, such as indexes that refer to the renamed table, are automatically adjusted. The syntax is as follows:
RENAME old_tablename TO new_tablename;
Scott’s company is changing the employee categorization method to differentiate between temporary part-time workers and permanent part-time workers. Therefore, a new table, EMP_HOURLY_TEMP, must be created, and the existing EMP_HOURLY table must be renamed to EMP_HOURLY_PERM:
RENAME EMP_HOURLY TO EMP_HOURLY_PERM; Table renamed.
| Warning | Any references to the old table in program code (such as C code using OCI) or in stored SQL scripts must be changed manually to reflect the new table name. |
The TRUNCATE Statement
From the perspective of the user, the TRUNCATE statement is similar to the DELETE statement. Both of the statements will delete rows from a table. The main difference is that the DELETE can be more selective (in other words, using a WHERE clause). The TRUNCATE statement simply removes all rows from a table. The TRUNCATE statement will also appear to run faster than a DELETE in most cases.
From a DBA’s point of view, however, the TRUNCATE and DELETE statements are very different. The TRUNCATE statement will immediately free any space from the deleted rows. The space from any rows deleted with DELETE will remain allocated to the table, and it may possibly be reused by future INSERT operations into the table. Also, the TRUNCATE statement is not recoverable; rows removed with DELETE can be recovered with a ROLLBACK statement. (Rolling back transactions is discussed in Chapter 7, "Logical Consistency.")
The syntax for TRUNCATE is very straightforward:
TRUNCATE TABLE tablename;
In Scott’s corporate database, one of the developers inadvertently loaded the EMP_HOURLY table with 50,000 rows from the wrong table. The developer realizes that the DELETE statement would fix this, but that the DBAs would be concerned about the space that would not be reclaimed. The table didn’t have any rows to begin with, so the developer determines that TRUNCATE would be the best option. Here is the command to remove all the rows, so that the table is now empty:
TRUNCATE TABLE EMP_HOURLY; Table truncated.
The table to be truncated must be in the user’s schema or the user must have the privilege to drop a table in another user’s schema (the same privilege that allows the user to completely drop the table).