Modifying Task Relationships
|
|
In even the best-laid plans, there comes a time when you need to change the relationship between tasks. This change could be as drastic as completely unlinking tasks or as simple as modifying the relationship type. Project offers a number of ways to change established relationships.
Unlinking Tasks
The easiest way to unlink a task is to select a task and then click the Unlink Tasks button on the Standard toolbar. This immediately removes all predecessor and successor links related to this task. If you want to remove only one link, select the predecessor and successor tasks and then click the Unlink Tasks button.
You can also delete links by selecting the links and then choosing Edit Ø Unlink Tasks.
Modifying Links with the Task Dependency Dialog Box
In the Task Dependency dialog box, you can change the type of a relationship and modify the lag or lead time. To access the Task Dependency dialog box, double-click the connecting line between two tasks.
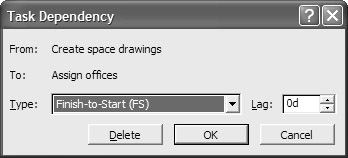
To change the relationship type, click the down arrow on the Type field, and select the Type from the drop-down list. If you choose None as the relationship type, the link is removed. You can also remove the link by selecting the link and then clicking the Delete button. Click OK to close the dialog box.
Using Forms and Tables to Modify Links
After you establish links, you can also modify them in the Task Information dialog box, the Task Entry table, and the Task Form.
Using the Task Information Dialog Box
To modify links in the Task Information dialog box, follow these steps:
-
Double-click the task to open the dialog box.
-
Click the Predecessors tab.
-
Select the field you want to edit.
-
Enter the modified information by selecting it from a drop-down list or typing in the field.
-
Click OK to close the dialog box and save the changes.
Using the Task Entry Table
To modify information in the Task Entry table, follow these steps:
-
Drag the vertical split bar to the right to display the Predecessors field.
-
Select the cell you want to edit. The pointer changes to an I-beam.
-
Click the cell again with the I-beam pointer to switch to Edit mode. The flashing insertion point appears.
-
Make any desired changes.
-
Press Enter, or select another cell to enter the changes.
Warning Do not attempt to remove a link by selecting a cell in the Predecessors column and then pressing Delete. This removes the entire task, not just the link. To remove a link, switch to Edit mode (see step 3 in the previous set of steps), select the entry, and press Delete.
Using the Task Form
To modify information in the Task Form, follow these steps:
-
Choose Windows Ø Split Screen to activate the Task Form at the bottom of the window.
-
Check to see that the Task Form is displaying Resources & Predecessors, Resource & Successors, or Predecessors & Successors. If one of these views is not the current view, right-click on the form and then choose one from the menu that opens.
-
Select the field you want to edit.
-
Enter the modified information by selecting it from a drop-down list or typing in the field.
-
Click the OK button on the Task Form to accept the change.
-
Close the Task Form by choosing Windows Ø Remove Split.
Project gives you two ways to edit the entries in a cell. You can select the cell and then switch to Edit mode by clicking again in the cell (or pressing F2), or you can select the cell and then click in the Entry bar. The Entry bar is the bar at the top of the task list in the Task Entry table. You can also find an Entry bar in the Task Form view and in the Task Information dialog box. The Entry bar becomes active only when a cell is selected and Project is in Edit mode. To switch to Edit mode, click in the Entry bar.

A flashing insertion point appears, along with a Cancel button (red X) and an Enter button (green check mark). To work in Edit mode, enter any text or use the Backspace or Delete key to delete text. Click the Enter button to record the changes, or the Cancel button to cancel them and restore the previous entry.
Using Autolink to Repair Broken Links
When you move, delete, or insert a task, Project automatically repairs the broken links created by the changes. In Figure 8.13, the first set of tasks is linked. In the second set, the middle task, Interview Sales Candidates, was deleted with Autolink on. The link was automatically re-created between Task 2 and Task 4. In the third set, the middle task was deleted with the Autolink feature off. The link was broken between the two tasks.

Figure 8.13: Autolink relinks tasks when deletions are made.
Autolink is turned on by default; however, you can choose to turn it off for a specific project, or change the default so that it is always off. To turn Autolink off, follow these steps:
-
Choose Tools Ø Options.
-
Click the Schedule tab.
-
Click to deselect the Autolink Inserted or Moved Tasks check box.
-
If you want Autolink off by default, click the Set as Default button.
-
Click OK to close the Options dialog box and save the changes.
Creating Links in an Outlined Task List
When you create outlined task lists, subtasks are automatically linked to their summary task. This link is inherent in the outlining feature; however, you have several options for how you want to link the summary groups and subtasks within those summary groups together. You can do the following:
-
Link subtasks with a summary group and link summary tasks together
-
Link subtasks between summary tasks
-
Link summary tasks to subtasks in other summary groups
Note For more about outlining tasks, see “Using the Outlining Features,” in Chapter 7.
Linking Summary Tasks to Each Other
The most common method of linking in an outlined task list is to link summary tasks together, and to link the subtasks to other subtasks within each summary group. This is the way Project creates links if you select all the tasks and click the Link Task button. This method gives you the flexibility to insert and delete tasks within a summary group, change task durations, and move tasks around without affecting the link with the next group of tasks. Figure 8.14 shows an example of linked summary tasks.

Figure 8.14: Linking summary tasks
| Tip | You can easily select all the tasks in a project by clicking in the blank space to the left of the column names and above the task numbers in the Task Entry table. |
Linking Subtasks between Summary Groups
Another method of linking tasks in an outline is to link subtasks together between summary groups. In the example in Figure 8.15, the last task in Office Space summary group, the Move Completed milestone, becomes the predecessor to the first task in the Marketing Plan summary group, Conduct Assessment of Business Environment. In addition, the last task in the Marketing Plan group, the Marketing Plan Developed milestone becomes the predecessor to the first task in the Telecommunications group, Identify Telecommunications Vendors.

Figure 8.15: Linking subtasks between summary groups
| Warning | If you choose this method, be careful if you insert, move, or delete subtasks. You must make sure that the links between groups are maintained even if the original relationship is no longer appropriate. |
Linking Summary Tasks to Subtasks
The third method of linking tasks in an outline is to link summary tasks to subtasks in other summary groups. Use this method if you want to link the completion of a summary group to a particular task within another subgroup. In the example in Figure 8.16, the summary task Office Space is linked directly to the second task in the Telecommunications summary group, Solicit Competing Bids. At the same time, all of the subtasks in the Summary Group are linked together. That creates the equivalent of a lag between the first Telecommunications task, Identify Telecommunications Vendors, and the second task, Solicit Competing Bids, because this third task can’t start until the Office Space tasks are all completed.

Figure 8.16: Linking summary tasks to subtasks in other groups
|
|
EAN: 2147483647
Pages: 241