Chapter 35. Working with Extensions
| CONTENTS |
| |
|
- How Dreamweaver Is Configured
- Working with the Configuration Folder
- Installing and Using Extensions
- Summary
Dreamweaver is unique in the world of commercial software because of the degree to which it can be tweaked, customized, and extended. Not only can you change defaults and tweak preferences, rearrange panel groups, and choose the classic or integrated workspace, but with Dreamweaver, you can actually change the program's functionality: create new panels, commands, and menu entries, and more. And it's all because of extensions.
This chapter examines how extensions work within the Dreamweaver architecture, and how you can start customizing your Dreamweaver program without any programming knowledge required by changing settings in Dreamweaver configuration files. The chapter also introduces the Extension Manager and the Macromedia Exchange for Dreamweaver, which you can use to download and install some of the hundreds of free and commercial extensions that have been created by other developers for your use.
How Dreamweaver Is Configured
Dreamweaver is not like other commercial software. Most programs are created in a programming language like C++, and then compiled into executable programs, meaning that you cannot delve into their structure to see how they were built or to adjust their functionality. It's become increasingly popular, over the last several years, for programs to offer plugin architecture, which allows third-party developers to create independent program modules called plugins, or Xtras, or Xtensions, or even filters, depending on the software involved. But these modules must generally also be constructed as compiled programs built in C++ or comparable languages.
Dreamweaver, on the other hand, was built with the express idea of enabling users to modify or add to the basic core of the program. To do this, the engineers built Dreamweaver as a combination of a compiled C core, with most of the interface and many of its functions coded into external JavaScript, XML, and HTML files. These external files are called extensions. By editing these extensions, you can customize how Dreamweaver looks and works. By adding to them, you can add to Dreamweaver functionality. Though you have to know your way around JavaScript to create your own extensions, it only takes a fundamental knowledge of HTML and XML to customize an extension's interface. And the Macromedia Exchange for Dreamweaver has hundreds of extensions written by other developers, available free or commercially for download and installation.
Note
| | See Chapter 36, "Creating Extensions," for a discussion on how to create your own simple extensions. |
Working with the Configuration Folder
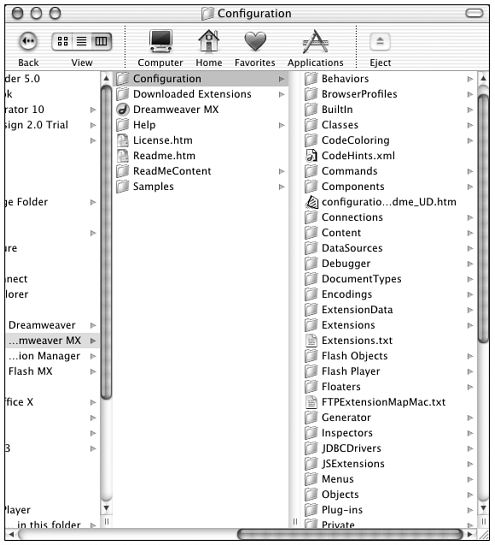
The key to all these menus, commands, and functions is the Configuration folder. This folder, located within the Dreamweaver Application folder, contains all the extension files for the program. Examine the Configuration folder (see Figure 35.1), and you'll recognize many of the folders within as matching Dreamweaver elements: Objects, Behaviors, Commands, Menus, Inspectors, and so on. Within those folders are the individual files that control the appearance and functionality of the different Dreamweaver interface elements. The general breakdown of file types within the folder is as follows:
Figure 35.1. The Dreamweaver Configuration folder and its contents.
-
HTML files provide the layout and interface elements for individual dialog boxes, panels, and inspectors.
-
The JavaScript files and any JavaScript code embedded within the HTML files provide the functionality for the different extensions.
-
The XML files provide the instructions Dreamweaver follows on how the different extensions should be integrated into the main program interface.
If you feel adventurous enough to tinker with these files, you can customize and even extend your Dreamweaver program. In this chapter, you'll get a chance to explore the HTML and XML files in the Configuration folder and changes you can make within them. The next chapter covers extending program functionality using JavaScript.
Warning
| | Important: Before making any changes to the Configuration folder, it is vital that you make a backup copy so that you may return Dreamweaver to its original state in case anything corrupts. You can store your backup wherever you want; just make sure that you copy the whole folder! |
Dreamweaver Configuration in a Multi-User Environment
How Dreamweaver Multi-User Configuration Works Dreamweaver creates multi-user configuration by having multiple Configuration folders. While most of the program's configuration tasks are carried out by the main Configuration folder stored within the Dreamweaver Application folder, each user also has his personal Configuration folder. For Dreamweaver/Windows, each user's personal configuration files are stored in: c:\documents and settings\username\application data\macromedia\ dreamweaver mx\configuration\ For Dreamweaver/Mac OS X, they're stored in: /users/username/library/application support/dreamweaver mx/ configuration (For each user, substitute the correct user name for username.) This folder is created the first time the user launches Dreamweaver. Examine one of these extra folders, and you'll see that it isn't a complete duplicate of the main Configuration folder. It contains only certain files, representing interface elements that need to be customized differently for each user. Preferences like code coloring, menus that can be customized with keyboard shortcuts, commands that can be recorded using the History panel, and even objects that save their dialog box settings from one work session to another; they are all represented in the individual user's Configuration folder. Multi-User Environments and the Configuration Folder How important is this to you? If you're just interested in being a general Dreamweaver user, all you need to know about multi-user configuration is that it's happening. If you're a tinkerer, however, working with configuration files to customize your program, you need to know which Configuration folder contains the files you want to work with for any given task. The general rule is this: When looking for extension files, Dreamweaver always looks in the user's Configuration folder first. This means that if a file exists in that folder, Dreamweaver will use it (and it won't use the duplicate file that exists in the main folder). Only if a particular extension file has no counterpart in the user's folder will Dreamweaver use the file in the main Configuration folder. Are You in a Multi-User Environment? If you're working on Windows 2000, NT, or XP, you might be working in a multi-user environment. If multiple users can log on to your computer (either because different people use the computer or because you have different user accounts for different purposes), you're in a multi-user environment. If, on the other hand, you're the only user who has access to your computer or has ever logged onto your computer, chances are you're not using multi-user capabilities and you won't have to worry about these issues. (Your c:\documents and Settings folder will contain folders for All Users and Default users, but no username folders will be present, and all Dreamweaver configuration files will be called from the main Configuration folder.) If you're working on Mac OS X, you are in a multi-user environment even if you're the only human who ever touches or signs on to your computer. If you're working on Windows Me, or 98, or on Mac OS 9, as far as Dreamweaver is concerned you are not in a multi-user environment even if you have multiple users logging into your system or have Multiple User Accounts enabled (Mac OS 9). |
Customizing Dialog Boxes Using HTML
Most objects, commands, and behaviors that provide dialog boxes store the layout information for those dialog boxes in HTML files within the Configuration folder. Input fields, checkboxes, pop-up menus, and such are created from standard HTML form elements, and formatted using tables or layers. While you can't add or remove input fields without compromising functionality, you can change the dialog box layout by changing the HTML layout. Strange as it might seem, you can even use Dreamweaver itself to do this editing though you will have to quit Dreamweaver and relaunch before your changes take effect.
Note
| | Dreamweaver loads HTML and JavaScript files into memory at startup, and generally doesn't access them again as it's running; this is why it's safe to work on these files while the program is running. Dreamweaver may access XML configuration files at any time, however; so it's not a good idea to work on these files from within the program itself. See Chapter 33, "Writing Code in Dreamweaver," for more information on text editors. |
To customize a particular dialog box, you first need to locate its configuration file. Table 35.1 lists locations for the elements you'll be most likely to customize. Within these locations, look for an HTML file named after the object, command, or other extension that you want to customize.
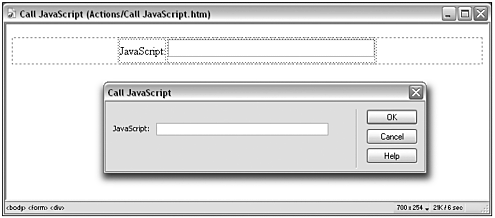
For instance, say you wanted to customize the Call JavaScript dialog box. Because Call JavaScript is a behavior, you'll look in Configuration/Behaviors/Actions. In that folder, you'll find Call JavaScript.js and Call JavaScript.htm. The JS file contains the functionality for the behavior; the HTML file contains the dialog box layout. If you open the HTML file in Dreamweaver, you'll see the dialog box layout as a form and table (see Figure 35.2). Any changes you make to the layout here will be reflected in the dialog box. Just don't rename the form or its elements, or add or subtract any form elements, or you might break the behavior.
Figure 35.2. The Call JavaScript.htm file, as it appears in Dreamweaver Design view and in the Call JavaScript dialog box.
Note
| | For multi-user environments: Because the Call JavaScript dialog box does not hold any settings from session to session, it does not exist as a user-specific file in the user's Configuration folder. It exists only in the main Configuration folder. |
| Extension Type | Location |
|---|---|
| Objects (items in Insert bar and Insert menu) | Configuration/Objects (within subfolders according to category) |
| Behaviors | Configuration/Behaviors/Actions |
| Commands | Configuration/Commands Configuration/Menus/MM |
| Inspectors [*] | Configuration/Inspectors |
| Panels[*] | Configuration/Floaters |
[*] Most panels, and many inspectors, are hard-coded into the main Dreamweaver application file, so you won't be able to customize them.
Exercise 35.1 Rearranging the Insert Table Dialog Box
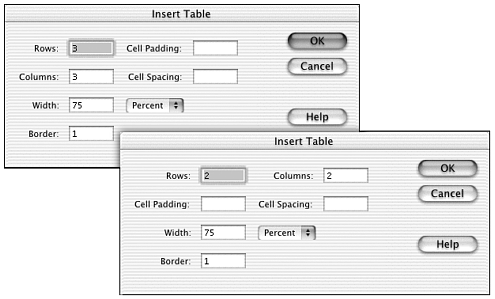
In this exercise, you'll edit the HTML configuration file behind the Insert Table dialog box (Insert > Table) so that the input fields are in a different order. You'll be swapping the Cell Padding and Columns fields. This alters the tab order for users filling in this dialog box, so they'll tab from Rows to Columns to Cell Padding to Cell Spacing. Figure 35.3 shows the old and new Insert Table dialog boxes, side by side.
Figure 35.3. The Insert Table dialog box, in its original layout (left) and after being customized (right).
Before you begin this or any exercise in this chapter, make sure you have a backup copy of the Configuration folder so you can restore the default Dreamweaver configuration at any time. Open the Dreamweaver application folder and copy Configuration to some other location on your hard drive.
-
On your hard drive, locate and open the Dreamweaver Configuration folder (refer back to Figure 35.1 if necessary).
-
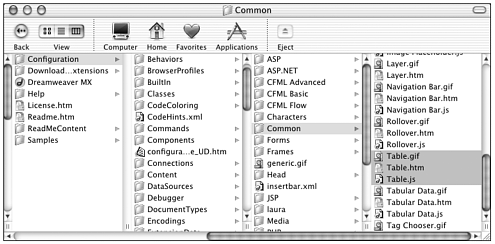
If you want to change the dialog box that belongs to the Table object, you need to determine where in the Configuration folder that file will be stored. Because the extension in question is an object, you'll start by looking in the Objects folder. Within that folder, the subfolders match the categories (tabs) of the Insert bar so you'll look inside the Objects/Common folder. And there are the configuration files for the Table object (see Figure 35.4). Table.gif creates the Insert bar icon for the object; Table.js contains the JavaScript code for creating and inserting the code; Table.htm contains the dialog box layout. That's the one you want to edit.
Figure 35.4. Configuration files for the Table object, as they appear in the Configuration folder.
-
Because the HTML files contain dialog box layout information, you want to edit Table.htm. Before you plunge into editing it, though, think twice! If you're in a multi-user environment, this might not be the copy of Table.htm you need to edit. If a user-specific Configuration folder exists, and if it has a Table.htm file, that's the one you'll need to edit.
-
Windows users, if you have a user-specific version of the Table file, you'll find it at c:\Documents and Settings\yourname\Application Data\Macromedia\ DreamweaverMX\Configuration\Objects\Common\Table.htm (substitute your user name for yourname).
-
Mac OS X users, if you have a user-specific version of the Table file, you'll find it at /Users/yourname/Library/Application Support/Macromedia/ Dreamweaver MX/Configuration/Objects/Common/Table.htm (substitute your user name for yourname).
If you navigate to the appropriate location for your OS and there is no such file, then you're not set up for multi-user Dreamweaver use. You can safely work on the copy stored in the main Dreamweaver/Configuration folder.
Note

Table.htm exists in the user-specified Configuration folder because each time a user creates a table and uses the Insert Table dialog box, Dreamweaver remembers the settings entered (rows, columns, and so on) by rewriting Table.htm to include those values. All configuration files that can be rewritten like this, based on use, are considered user-specific.
-
-
After you've determined where your active copy of Table.htm is, open it in Dreamweaver. Switch to Design view, if you're not already there, and examine the layout elements. The Insert Table dialog box is constructed from a form containing a table and several form elements.
-
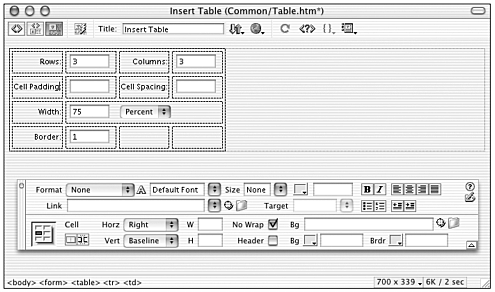
Using cut-and-paste or drag-and-drop (your preference!), swap the Cell Padding input field and the Rows input field. Then retype the text labels for each element to match its new placement. And finally, so that the newly placed Cell Padding label doesn't wrap in its table cell, select that cell and turn on the No Wrap option in the Property inspector. Figure 35.5 shows these changes being made.
Figure 35.5. Customizing the Insert Table dialog box by rearranging the input fields and labels.
-
When you've made your changes, save the file and close it. Then quit Dreamweaver and relaunch it.
-
Now, create a new document (unless one is already open) and try inserting a table. Choose Insert > Table from the menubar, or click the Table object in the Insert bar. Your new dialog box should look just like the one shown in Figure 35.3. (If Dreamweaver gives you an error message when you try to insert a table, or if the dialog box looks wrong, you've made a mistake in your coding. Re-open Table.htm and try again. If the dialog box looks completely unchanged, you probably edited the wrong copy of Table.htm. Double-check your various Configuration folders to make sure you edited the correct file.)
Note
| | In a multi-user environment, the copy of Table.htm stored in the Dreamweaver/ Configuration folder is used as the model to create new user-specific configuration files. If you edit that file, you'll create a different table-making experience for all future Dreamweaver users who might start using your computer. |
Customizing the Insert Bar with Insertbar.xml
| | New to Dreamweaver MX, the Insertbar.xml file determines what appears, and where, in the Insert bar. This XML file uses custom tags to determine the tabs (categories) that will appear in the Insert bar, what objects each tab should contain, and what order they'll appear in. While you can't add a new object without learning how to write the JavaScript that will construct the object, you can rearrange the existing objects and tabs and even create new tabs to put existing objects in with just a little knowledge of XML. |
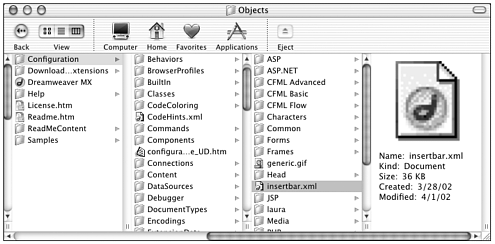
Insertbar.xml is located in Configuration/Objects (see Figure 35.6). To examine this file, open it in a text editor (not Dreamweaver, preferably). The structure of XML tags breaks down like this:
Figure 35.6. The Insertbar.xml file as it appears within the Configuration folder.
<insertbar> <category> <button /> <button /> <category> etc more categories <insertbar> The entire document is enclosed within <insertbar></insertbar> tags. Inside this root element, each tab of the Insert bar is represented by <category> elements (tags). Their order determines the order of tabs in the Insert bar. And within the <category> element, each object is represented by a <button/> element, whose attributes determine among other things which HTML file contains the object code and which GIF image should be used as the Insert bar icon. Other elements, such as <separator/> and <checkbutton/>, allow different kinds of content to be presented in the Insert bar.
Note
| | Because Insertbar.xml is an XML file, its code follows the syntax requirements of all well-formed XML documents. For a discussion of XML, see Chapter 32, "Technical Issues." |
To rearrange the order that objects appear in a particular tab, open Insertbar.xml and rearrange the order of <button/> elements within the appropriate <category> element.
To copy an object so it appears in another tab, without being removed from the original tab that contained it, copy the object's <button/> element from the original location, and paste it into the new <category> element.
To move an object from one tab to another, cut its <button/> element from the original location, and paste it into the new <category> element.
To add a vertical separator bar between icons in the bar, add a <separator/> element in the appropriate location.
To create a new tab, you must do two things: First, in the Configuration/Objects folder, add a new folder with a unique name of your choice. Then, in Insertbar.xml, add a new <category></category> tag pair in the appropriate location (the tabs appear in the order of the <category> elements, remember). The <category> element should have the following syntax (substituting your information for the code shown in bold):
<category id="your_unique_ID" folder="your_folder"> </category>
You don't have to put anything in your new folder; but it must be present in the Configuration/Objects folder, or the tab won't show up in the interface.
Note
| | For multi-user environments: Insertbar.xml is not a user-specific file, so it will only exist in the main Dreamweaver/Configuration folder. |
Exercise 35.2 Creating a Favorite Objects Tab in the Insert Bar
In this exercise, you'll create a new tab (category) for the Insert bar, called Favorites. To populate this tab, you'll copy references to your various favorite Dreamweaver objects from other tabs in the Insert bar. You'll also use separators to organize your favorites.
Before you begin this or any exercise in this chapter, make sure you have a backup copy of the Configuration folder, so you can restore the default Dreamweaver configuration at any time. Open the Dreamweaver application folder, and copy Configuration to some other location on your hard drive.
-
Before you can create a Favorites tab, you need to determine which Dreamweaver objects are your favorites. Launch Dreamweaver and browse through the Insert bar, making a note of which objects you tend to use the most. You're especially looking for objects that appear in different tabs, causing you to waste valuable work time jumping from tab to tab. (If all of your favorite objects are in the Common tab, then that's your favorite tab!)
-
Next, you need to create a Favorites folder. Using Windows Explorer or the Mac Finder, find and open the Configuration/Objects folder within the Dreamweaver application folder. Create a new folder. Name it Favorites.
-
To establish the new folder as a new tab (category), open Insertbar.xml in your text editor (preferably not Dreamweaver). You'll position your new tab at the end of all existing tabs so you can find it easily so scroll down to the last </category> tag , immediately preceding the closing </insertbar> tag. Insert the following code:
<category id="My_Favorites" folder="Favorites"> </category>
-
To populate the new category, go through your list of favorite objects. For each object, find the corresponding <button/> element in Insertbar.xml. Copy the entire <button/> element, and paste it in between your <category></category> tags. Though your objects can be in any order, you might want to place them logically according to their original category, for instance so your Favorites tab will be easy to read.
-
Finally, a little cosmetic smoothing out. If you have objects from several categories in your Favorites tab, you might want to separate them visually. To insert a vertical separator bar between each group of objects in your tab, insert a <separator/> tag in the appropriate places.
Figure 35.7 shows a possible Favorites tab as it appears in the Insert bar. The code for this new tab would read as follows:
Figure 35.7. The Insert bar showing its new custom Favorites tab with objects.

<category id="My_Favorites" folder="Favorites"> <button id="DW_Table" image="Common\Table.gif" enabled="!_VIEW_LAYOUT" showIf="" file="Common\Table.htm"/> <button id="DW_Image" image="Common\Image.gif" enabled="" showIf="" file="Common\Image.htm"/> <button id="DW_Frames_Left" image="Frames\Left.gif" enabled="" showIf="" file="Frames\Left.htm"/> <button id="DW_Head_Keywords" image="Head\Keywords.gif" enabled="" showIf="" file="Head\Keywords.htm"/> <button id="DW_Head_Description" image="Head\Description.gif" enabled="" showIf="" file="Head\Description.htm"/> </category>
Tip
| | Is your Insert bar getting a little bit crowded with all those tabs in there? If there are particular categories of objects that you never use, you can ease the squeeze by removing their <category> elements from Insertbar.xml to remove their tabs from the Insert bar. (You'll still be able to insert the objects by using the Insert menu, so you haven't lost those objects forever.) If you do this, though, be sure you have backed up your Configuration folder or at least the Insertbar.xml file, because there's no getting it back otherwise! |
Customizing Dreamweaver Menus with menus.xml
Every command that appears in the Dreamweaver menu system which includes the application menus, contextual menus, and others is determined by the menu configuration file, menus.xml. This file governs what menus appear in the menubars, what commands appear in each menu, and what action Dreamweaver should take when that command is chosen. (The action is usually to open and execute a configuration file, such as Objects/Common/Table.htm.)
Menus.xml is located in the Configuration/Menus folder. Like Insertbar.xml, it is a well-formed XML document. It contains a <menubar> tag pair as its root element, with various other elements (tags and tag pairs) nested within it. The main element structure is as follows:
<menubar> <menu> <menuitem/> <menuitem/> </menu> etc more menus </menubar>
Note
| | The Configuration/Menus folder also contains menus.bak, a backup file for menus.xml. If you accidentally trash your only copy of menus.xml, you can duplicate menus.bak, change its extension to .xml, and resurrect your Dreamweaver menu system. (This doesn't mean you shouldn't back up your Configuration folder! If you rely on the BAK file for your backup, and it becomes corrupted, you'll need to reinstall Dreamweaver to get your menus back in working order.) |
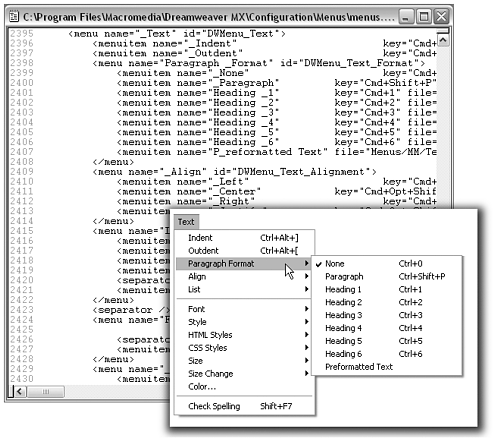
Each tag has a set of attributes that govern how each menu and command will appear, and what will happen when it is launched. Figure 35.8 shows a section of menus.xml and how it translates into a menu in Dreamweaver.
Figure 35.8. A section of menus.xml and the Dreamweaver menu it creates.
While you can't add an entirely new menu item, and give it functionality without scripting, you can still customize your menu system by tweaking the XML. You can move menu items, add separators between items, and even copy menu items so they appear in multiple places once in a regular menu and once in a contextual menu, for instance. One caveat related to duplicating menu items, however: Each item in menus.xml has an id attribute, which must be unique. If you duplicate an item, you must change the duplicate's id so it is different than that of the original item.
Exercise 35.3 Adding a Command to a Contextual Menu
In this exercise, you'll climb around inside menus.xml and copy the Check Spelling command from its location at the bottom of the application menubar's Text menu to another location at the bottom of the contextual menu for text items.
Before you begin this or any exercise in this chapter, make sure you have a backup copy of the Configuration folder, so you can restore the default Dreamweaver configuration at any time.
-
To start, quit Dreamweaver (if it's running) and open menus.xml in your text editor. Note that this is a big file, and it's easy to get lost in here! To help you out, if your text editor supports line numbers and word wrap control, turn on line numbering and turn off word wrap (called soft wrap in some programs). This will make navigating and seeing the structure of the XML tags easier.
-
The hardest part of this whole procedure is finding your way around menus.xml. You're looking for the Check Spelling menuitem, which is at the bottom of the Text menu. You can try performing a search for "spelling," or you can use your line numbers to navigate to line 2485. (Depending on what third-party extensions you might have installed in your copy of Dreamweaver, your Check Spelling menuitem might not be exactly at line 2485, but it should be close.)
-
Select the entire Check Spelling menuitem, and Edit > Copy. Your selected code should look like this:
<menuitem name="Check Spelling" key="Shift+F7" enabled="dw.getDocumentDOM() != null && dw.getDocumentDOM().getParseMode() == 'html' && (dw.getFocus() == 'textView' || dw.getFocus(true) == 'html' || dw.getFocus() == 'document' && dw.getDocumentDOM().getFocus() == 'body')" command="if (dw.getDocumentDOM().getView() == 'code') {dw.getDocumentDOM().setView('split')}dw.setFocus('document'); dw.getDocumentDOM().checkSpelling()" id="DWMenu_Text_CheckSpelling" />(What's all that code for? The Check Spelling command doesn't call on an extension file; instead, all the code for the spell check is contained in the menu entry itself.)
-
Now you have to find the Text contextual menu. This is a little bit trickier because there's no unusual word like spelling to search for. But if you examine a few of the contextual menu entries (they start around line 76), you'll see that each contextual menubar entry ends with Context">. Perform a search using that, and you'll find each contextual menubar. You'll find the Text contextual menu at around line 631. After you've found that, you can search for </menubar>, because the next occurrence of that tag will be the end of this menubar. The last menuitem entry should be Page Properties, at around line 769.
-
You want to create a new line after the Page Properties entry. To create a separator line, so your new entry sits by itself at the bottom of the menu, type the following into the new line:
<separator/>Then create another new line and Edit > Paste to insert the Check Spelling menuitem.
-
Finally, you need to find the new menuitem's id attribute and change it slightly so it's unique. Find the end of that very long <menuitem/> tag, and change the id to the following (new code is in bold):
DWMenu_Text_CheckSpelling_ContextJust to make sure your new id is unique, perform a search of menus.xml for this name. You should find just one occurrence of it the one you just added.
-
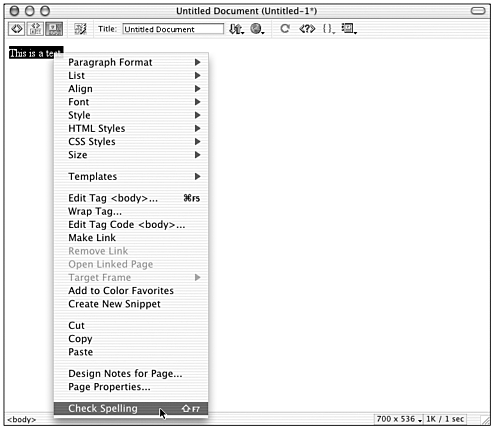
Launch Dreamweaver and try out your new menu! Type some text into a document, select the text, and right-click (Windows) or Ctrl-click (Mac). The contextual menu that appears will look like the one shown in Figure 35.9.
Figure 35.9. The Text contextual menu with separator and Check Spelling command added.
Installing and Using Extensions
If you want to move beyond customizing Dreamweaver into actually extending its functionality, you're ready for some new extensions. If you want to take advantage of the programming prowess of others, without having to write extensions yourself, you're ready for the Macromedia Exchange for Dreamweaver and the Extension Manager.
The Macromedia Exchange for Dreamweaver
The Macromedia Exchange for Dreamweaver is a huge storehouse of extensions that Macromedia has collected and put on the web for all to use. Although Macromedia has written some of these extensions, the majority was written by independent developers who created the extensions to help themselves and have agreed to share them with the Dreamweaver community. These extensions have been packaged in a common format (MXP) and put on the Exchange for all to use. Most are free, though a few are commercially produced and might have a small cost.
Note
| | The Exchange is not the only place to find extensions. Many extension-writing Dreamweaver developers have extensions and have placed them and others on various web sites. See Appendix B, "Online Resources for Dreamweaver Web Developers," for listings of some popular developer web sites. |
Access the Macromedia Exchange for Dreamweaver by pointing your browser to www.macromedia.com/exchange/dreamweaver (see Figure 35.10). Hundreds of different extensions are available for adding all sorts of functionality to Dreamweaver everything from enabling site searches to installing lists of country codes to adding new Flash button styles. All extensions have been tested by Macromedia to assure that they'll install and function correctly; those with Macromedia approval have been tested more rigorously, and meet Macromedia UI guidelines so they'll blend smoothly with the Dreamweaver interface. You can browse extensions by category or search by title or author. To actually download extensions, you'll need to sign up for a free Macromedia Exchange account.
Figure 35.10. The Macromedia Exchange for Dreamweaver, home to hundreds of (mostly) free extensions.
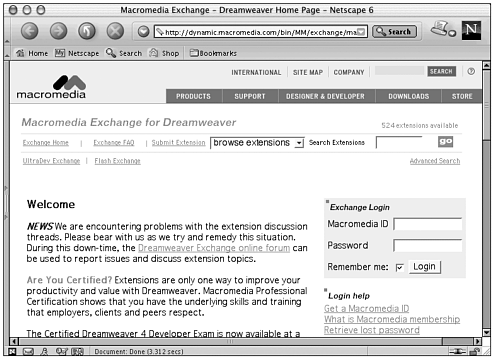
You can also access the Exchange from within Dreamweaver, by choosing any of the Get More commands, such as Insert > Get More Objects, Commands > Get More Commands, or the Get More Behaviors command at the bottom of the Behaviors panel's Actions popup menu. Choosing any of these commands will launch your browser and take you to the Exchange home page.
To download an extension from the Exchange, find the extension you want and follow the links to its download page; then choose the Windows or Mac version, and download. Extensions are usually very small files (most are under 100K) and therefore download quickly even on slow connections. The downloaded file will be a special installer file with the .mxp extension (Macromedia eXtension Package), which can be installed into Dreamweaver using the Extension Manager utility.
The Extension Manager
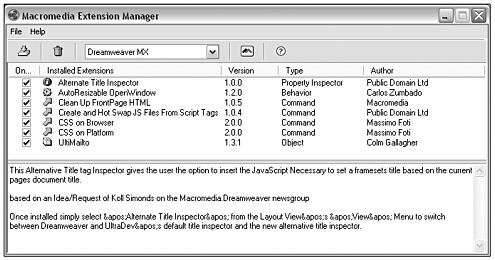
The Extension Manager (EM) is a utility program used to install and manage your downloaded extensions (see Figure 35.11). You can launch the Extension Manager from within Dreamweaver by choosing Commands > Manage Extensions or Help > Manage Extensions. You can also launch it from your desktop through Start > Programs > Macromedia > Macromedia Extensions Manager (Windows) or by finding and launching it from within the Macromedia Extension Manager folder (Mac). From your desktop, you can also double-click on any MXP file to automatically launch the Extension Manager.
Figure 35.11. The Extension Manager interface showing several Dreamweaver extensions already installed.
Note
| | The Extension Manager isn't just for Dreamweaver. It also installs and manages Flash and Fireworks extensions. |
To install an extension using the Extension Manager, either double-click on the MXP file on your desktop, which will launch the EM and start the installation process, or launch the EM separately, and choose File > Install Extension. Installation generally doesn't take long. During the installation process, extension files are added to the appropriate places in the Configuration folder and any relevant XML files (like Insertbar.mxl or menus.xml) have new information added to them. Some extensions require that Dreamweaver be restarted before they'll appear in the interface; the EM will alert you if this is the case.
After the extension is installed, you can read all about it in the EM interface (see Figure 35.11). You can temporarily deactivate the extension by deselecting it in the extensions list. Or you can permanently delete it by selecting it and choosing File > Remove Extension.
Note
| | In addition to installing extensions, the Extension Manager can be used to package extensions into MXP files, and even to submit them to the Macromedia Exchange for Dreamweaver. See Chapter 36 for more on using the EM in this way. |
Exercise 35.4 Downloading and Installing the Zero Page Borders Extension
In this exercise, we will download and install Andrew Wooldridge's Zero Page Borders extension, a simple but handy command that quickly sets your document's margins to 0 as if you had set all relevant values in the Modify > Page Properties dialog box.
-
From within Dreamweaver, choose Commands > Get More Commands. This will launch your browser and take you to the Macromedia Exchange for Dreamweaver.
-
If you haven't already created a Macromedia user account, take a moment to do so now. It's as simple as entering a user ID and password (see Figure 35.10).
-
Because you know the extension you want, you can search for it. In the Exchange's search field, type Wooldridge, and click Search.
-
After a moment, a list of Andrew Wooldridge's extensions will come up. Find Zero Page Borders and click on it. From here, you'll be taken to the downloads page. Choose the appropriate download format (Windows or Mac) and download.
-
You've downloaded the file! Find it on your hard drive it's an MXP file called Zero Page Borders.mxp and double-click it to launch the Extension Manager. You'll be prompted to agree to the Macromedia license for extensions (click Agree to continue), and then you'll get a message telling you the extension was successfully installed. Congratulations!
-
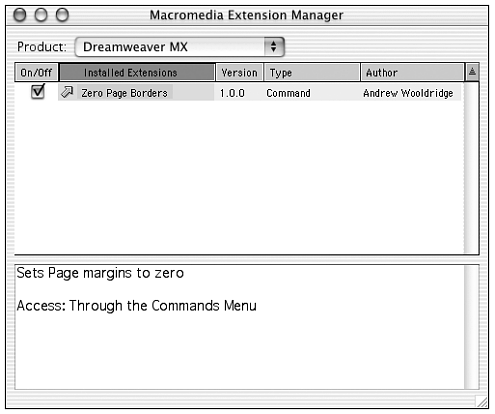
Examine the EM interface to learn more about this extension (see Figure 35.12). You'll see that it's a command, accessed through the Commands menu, and that it sets the page borders to zero. What could be simpler?
Figure 35.12. The Zero Page Borders extension as it appears in the Extension Manager.
-
If you had Dreamweaver running when you installed this extension, you didn't get prompted to quit and relaunch. That means the extension should work right away. If you don't have Dreamweaver running, launch it now.
-
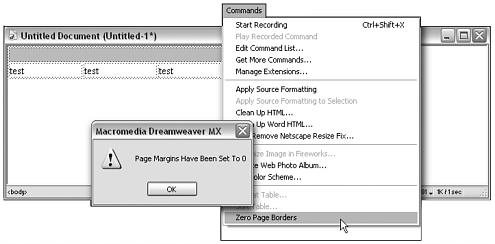
In Dreamweaver, create a new document, unless one is already open. Type a few words on the page so you can see the default page margins in action (about 8 pixels worth of space on top and left). Go to the Commands menu there's your new command! Choose Commands > Zero Page Borders. You'll get a prompt telling you the command has executed, and your margins are moved (see Figure 35.13)!
Figure 35.13. The Zero Page Borders command in action.
Summary
The extensible architecture behind Dreamweaver makes it unique in the commercial software world. Thanks to the Configuration folder, with its HTML, XML, and JS files, almost all aspects of the program's interface and functionality can be customized and added to relatively easily. If you enjoy tinkering with HTML and XML, the nonscripted files of the Configuration folder allow you to customize menus, dialogs, and even some panels. If you love souping up your program with extra functionality, but don't want to become a programming geek to do it, the Macromedia Exchange for Dreamweaver and Extension Manager open up a world of extensions that are easily installed and immediately useful. For those of you who do want to dip your toes a little deeper into the pool, keep reading: The next chapter introduces you to the wonderful world of scripting, packaging, and sharing your own extensions with the Dreamweaver community.
| CONTENTS |
EAN: 2147483647
Pages: 49