Chapter 31. Building a Basic JSP Site
| CONTENTS |
| |
|
- Setting Up Your Workstation to Work with JSP
- Setting Up a JSP Site in Dreamweaver
- Interview: Harlow Pinson
- Setting Up a Database Connection
- Displaying Dynamic Data
- Summary
Of all the server technologies, JSP is probably the most intimidating for newcomers to this arena. If you're just starting out, you might want to get your feet wet with ASP, ColdFusion, or PHP first. JSP has a lot to offer developers, but it's mostly of interest to those already working with Java. If you're reading this chapter, you're probably either working in an environment where Java is already being used for web development, or you want to learn Java. JSP has some exciting development options, such as JavaBeans and custom tag libraries and Dreamweaver has tools for working with all of them. This chapter will take you through the steps of setting up your workstation for Java application serving, defining a JSP site within Dreamweaver, and using the Dreamweaver tools to create a basic live data page. This chapter also touches on using JavaBean collections and custom tags.
Setting Up Your Workstation to Work with JSP
As explained in Chapter 26, "Introduction to Dynamic Dreamweaver," preparing your workstation to work with any data-driven server technology involves setting up the web server and application server; making sure your DBMS and database are in place; installing any necessary drivers for the database; and making sure everything works. When working with JSP, there is also the extra step of creating a web application. The following sections walk you through obtaining and setting up the Apache Tomcat server and setting up a database and driver for Access or MySQL. Because the Tomcat server is Java, and will function on Windows and Mac OS X, instructions cover both platforms.
Note
| | Mac users: If you're using OS X, for the first time in Dreamweaver history you have the option of doing all development on your computer, without having to create an FTP connection to an external server. Be warned, however: All the OS X advanced web-serving capabilities are based on UNIX, and are not for the timid. If you have the option to connect to an external server, this is still probably the easiest solution for you. (See Chapter 26 for instructions on connecting to a remote server for Dreamweaver dynamic sites.) |
Setting Up the Web Server/Application Server
Like the other server-side technologies, JSP requires an application server to process live data pages and construct HTML for browser display. Because JSP uses Java, the application is Java-based; in Java-speak, it's called a servlet container. A variety of servlet containers are available, including the following:
-
Apache Tomcat. This open-source server is part of the same development project that creates the Apache HTTP server (see Chapter 27, "Building a Basic ASP Site"). Tomcat is free; recent releases have been proven to be stable and fast. It will run on any platform that fully supports Java, including Windows, UNIX, and now Mac OS X. Tomcat can be used in conjunction with an HTTP server, or it can be used in standalone mode, instead of an HTTP server.
-
Macromedia JRun. This commercial server is widely popular as a robust and powerful JSP server. Although it is not free, a special free development version is available from Macromedia and is included on the Dreamweaver MX installation CD. JRun is for Windows only.
-
IBM WebSphere. Another popular commercial server, WebSphere also is available in a free development version. WebSphere is for Windows only.
Note
| | A servlet is an application that is executed by the server at runtime. (It's comparable in many ways to an applet, which is run by the browser at runtime.) The servlet's function is to construct the HTML code for the browser to display. When you create a JSP document, the application server uses the Java code embedded in that document to construct a servlet. Then the servlet is executed, which creates the final page. |
For the exercises in this chapter, Tomcat standalone server is used. Tomcat installation and setup is covered in the following sections, separated by OS where Windows and Mac instructions substantially differ.
Note
| | Why use Tomcat for development? Besides being cross-platform, Tomcat is the simplest of the servlet containers to set up. Its no-frills approach doesn't give you one more piece of complex software to deal with, or one more GUI to master. Using Tomcat makes it much easier to see what's going on under the hood of your Java web applications. |
Setting Up Tomcat (Windows)
Tomcat installation for Windows is very easy, because the open source developers have provided a slick little GUI for its working. However, Tomcat requires that a Java runtime environment be set up which means installing the Java SDK before you can install Tomcat.
Download and Install J2 SDK
Your first stop, in setting up for JSP on Windows, is to download and install the Java 2 Software Development Kit (J2SDK). This software package includes the J2SE runtime environment (the virtual machine that allows Java programs to run), along with various utilities and database drivers for programming in Java.
To download the J2SE, go to http://java.sun.com/j2se/1.4/download.html, or go to the Java main web page (http://java.sun.com) and follow the links to J2SE. From the download page, select the Windows version of the SDK.
Note
| | As with all web technology, the Java platform is constantly evolving. By the time you read this, newer versions of the Java runtime environment might be available. Download the latest stable release that includes the SDK (software development kit). |
The downloaded file is an EXE. After the download has finished, double-click this file to launch the installer and follow the instructions to complete the installation. Accept the default install location (at the root of your c: drive) and options. When you're done, the newly installed SDK will be located on your hard drive at c:\j2sdk1.4.0.
Note
| | You must install the J2SDK whether you plan to use Tomcat or one of the other Java application servers. None of the servers can operate without the Java runtime environment. |
Download and Install Tomcat
Now that Java is in place on your computer, it's time to install Tomcat. To do so, follow these steps:
-
To download Tomcat, go to http://jakarta.apache.org/builds/ jakarta-tomcat-4.0/release/v4.0.3/bin/. From the list of Tomcat versions, select and download jakarta-tomcat-4.0.3.exe.
-
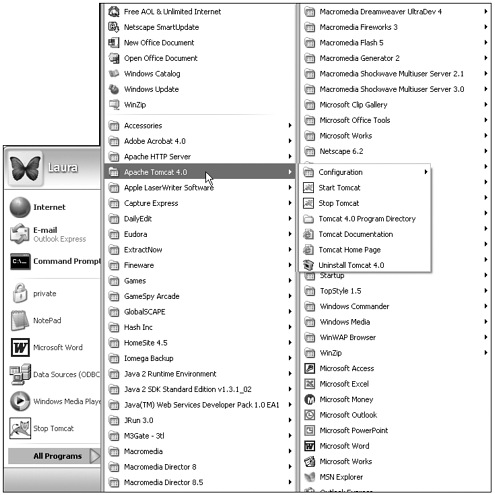
After the download has finished, double-click the EXE file to launch the installer and follow the instructions that appear. If you are using one of these operating systems, choose to install the WIN NT/2K/XP option. When the installation finishes, go to the Start menu and choose Programs > Apache Tomcat. There's your installed program (see Figure 31.1).
Figure 31.1. Apache Tomcat available under the Start menu (Windows).
Start and Stop Tomcat
The Tomcat server doesn't start automatically at boot-up time, the way IIS does. To start Tomcat, go to Start > Programs > Apache Tomcat > Start Tomcat. This opens Tomcat in a new command-line window. You can minimize this window, but leave it open as long as you want the server to run (see Figure 31.2).
Figure 31.2. The Tomcat window showing that the server is up and running (Windows).
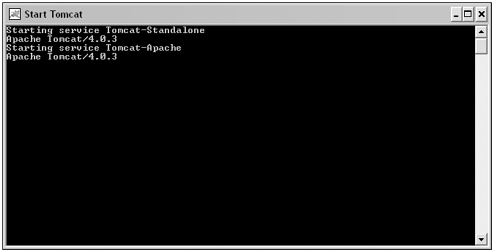
Tomcat will stop automatically when the computer shuts down. If you want to shut it down before then, go to Start > Programs > Apache Tomcat > Stop Tomcat. A stop message will appear in the Tomcat command-line window, and the window will close.
Tip
| | If you plan to be working extensively with Tomcat, place shortcuts for Start Tomcat and Stop Tomcat on your desktop, or in your taskbar, for easy access. You also can add it to your Windows Start Group if you want it to launch automatically whenever you start your computer. |
Setting Up Tomcat (Mac OS X)
Tomcat installation for OS X is a fairly simple process, but it does involve a trip to the Terminal window and some work with the command-line interface. One of the nice features of OS X is that it comes with the Java runtime environment already installed and active so, unlike Windows users, you won't have to worry about that preliminary step.
Before You Begin
You will need to know a few items of information about your system before you can install Tomcat.
-
What is your username? Your username is the name you chose for yourself when you first set up your computer. It's the same name used for your Home folder. To find your username, launch System Preferences from the Dock, and view the Users preferences. Select your account from the list, choose Edit User, and look at the name in the Short Name field. (It's the short name you'll be using as you install Tomcat.)
-
What is your password? You gave yourself a password when you set up your computer. You need to know it anytime you install software. (If you have forgotten your password, the Password tab in the Users panel will include the hint that you defined when you set up your computer.)
-
Where is Home? This is the folder that appears when you click the home icon in the Finder window toolbar. It's named the same as your username (for instance, Fred). On your hard drive, it's located in the Users folder. In UNIX-speak, its address is /users/fred.
For purposes of the examples in this chapter, the username will be fred. Whenever you see Fred or fred in an example, substitute your username.
Download and Install Tomcat
To download and install Tomcat, follow these steps:
-
To download Tomcat, go to http://jakarta.apache.org/builds/ jakarta-tomcat-4.0/release/v4.0.3/bin/. From the list of Tomcat versions, select and download jakarta-tomcat-4.0.3.tar.gz.
-
Put the downloaded file in your Home folder. (This is the folder that appears when you click the home icon on Finder window toolbars. It should have your username. Its address on your system is /users/fred, or ~/.)
-
Everything else in the installation process occurs in the command-line interface of the Terminal window. To prepare for that, find and launch the Terminal. (It's in applications/utilities/terminal.)
Tip

If StuffIt uncompressed the archive automatically as part of your downloading process, you can move the uncompressed folder into your Home folder and skip step 4 of this procedure.
-
The installation file you downloaded is a tar.gz file, which is a UNIX-style archive. To install it, you need to unpack the tar.gz file.
Start by navigating to your home directory, by typing this:
cd /users/fredor
cd ~/To end the command line, press Enter or Return. (Do this every time you type a line in the Terminal. It tells the computer to execute the command you just gave it.)
Unpack the archive by typing this (no typos!):
tar -xzvf jakarta-tomcat-4.0.3.tar.gzFigure 31.3 shows what these code entries look like in the Terminal window.
Figure 31.3. Unpacking the Tomcat archive in the Terminal window (Mac) my username has been substituted for Fred's.
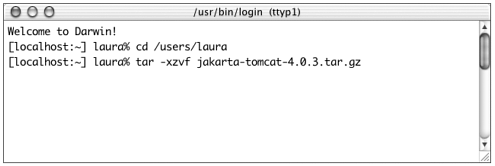
After a few moments, the Terminal window will again display the % prompt, which means it's ready to accept more commands.
-
To see the results of your unpacking outside the Terminal window, you can hide it and use the Finder to look in your Home folder. Figure 31.4 shows the new file structure.
Figure 31.4. The Tomcat files installed into the Home folder my username has been substituted for Fred's.
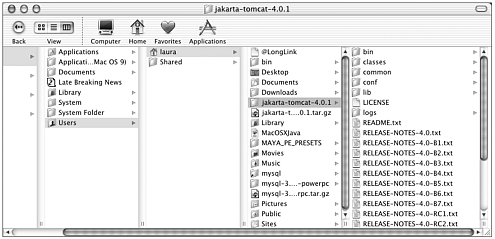
Create Scripts to Start and Stop Tomcat
Tomcat is now installed, but it isn't running and, unlike regular programs, you can't just double-click anything to launch it. Tomcat must be launched from the Terminal window. Because you'll need to launch it every time you want to work on a JSP site, you'll create start and stop scripts. You'll also create a special folder, called bin, in your Home folder to hold those scripts. Again, it's all done in the Terminal.
-
To start, create and open the bin folder by going to the Terminal Window and typing the following:
cd ~/ mkdir bin cd bin
(You just used the Terminal to navigate to the Home folder, make the bin folder, and navigate to the bin folder.)
-
Create a new script (text) file. Although you can do this with BBEdit or another text editor (even Dreamweaver), it's much safer to do it within the Terminal window, using a command-line text editor. And you can do it with one line of code. To create a new file in the bin folder and open it in the pico text editor, just type:
pico start_tomcat -
What you're doing when you type this line is telling pico to create a file called start_tomcat. As soon as you press Return/Enter, the Pico screen appears (see Figure 31.5) ready to put some code in that new file.
Figure 31.5. The Terminal window showing the pico text editor with the startup script text entered (Mac).
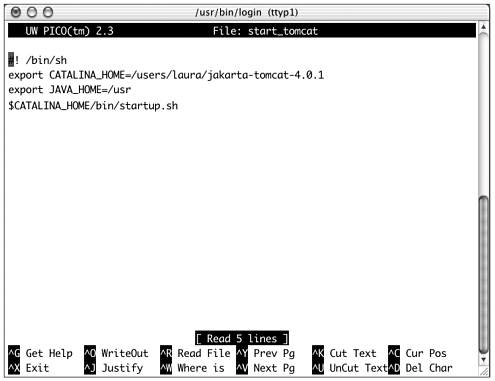
Type the following contents (like using a word processor, but without the mouse; use arrow keys to get around, if necessary):
#! /bin/sh export CATALINA_HOME=/users/fred/jakarta-tomcat-4.0.3 export JAVA_HOME=/usr $CATALINA_HOME/bin/startup.sh
(The first line tells the OS that this is a certain kind of script file. The second line creates a variable called CATALINA_HOME the OS will look for this variable, with this exact name, to point to your Tomcat files. The third line creates a variable called JAVA_HOME, which points to the location of the Java tools on your computer. The final line tells the OS to run the startup.sh script, located in the Tomcat folder.)
-
Save and exit pico with a series of Command key shortcuts:
-
Ctrl+O (for "output to disk")
-
Enter (to confirm that you're saving the start_tomcat file)
-
Ctrl+X (for "exit")
The % prompt will reappear, indicating that you're not in pico anymore.
-
-
Repeat the preceding process to create the shutdown script.
Start by typing:
pico stop_tomcatIn the pico editing window, type the following:
#! /bin/sh export JAVA_HOME=/usr export CATALINA_HOME=/users/fred/jakarta-tomcat-4.0.3 $CATALINA_HOME/bin/shutdown.sh
-
Save and quit Ctrl+O, Enter, Ctrl+X.
-
To see your new files, type the following:
ls -lThis will give you a directory of the bin folder.
-
Currently, your scripts are text files that can only be read, not programs or scripts that can be executed. Change your files to executable by typing this:
chmod ug+x start_tomcat stop_tomcat -
Put your scripts to work! Start Tomcat, by typing the following:
~/bin/start_tomcatIf everything has been set up properly, you'll see the Tomcat startup screen (see Figure 31.6).
Figure 31.6. Starting up Tomcat from the Terminal window (Mac).

-
Then stop Tomcat by typing the following:
~/bin/stop_tomcat
What can go wrong? Lots of things! If you script contains any typos, it will generate an error. If you created your script files in a regular text editor (such as BBEdit), instead of in pico, there might be bad invisible characters in there. You'll get a Script Not Found message. If this happens, start over at step 1 of this section and repeat the script process. (After you've created the start_tomcat and stop_tomcat files, the next time you navigate the Terminal window to ~/bin and type pico start_tomcat or pico stop_tomcat, the files you created will open for editing.) You can't continue until you can successfully launch Tomcat.
Take Tomcat for a Test Drive
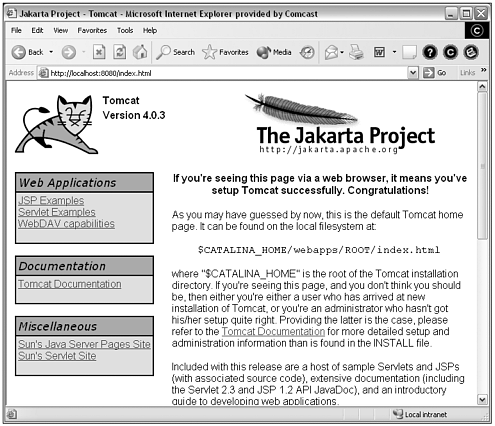
After you've got Tomcat up and running, it's time to test it out. Start Tomcat up, following the instructions for your operating system. Then open a browser and type the following into the URL field:
http://localhost:8080/ If everything is configured correctly, the Tomcat home page will display (see figure 31.7). If you completed the previous sections without error, there really isn't anything else that is likely to go wrong.
Figure 31.7. The Tomcat home page appearing at http://localhost:8080.
Note
| | What's the :8080 for? You might not know it, but your computer has various ports through which data can be served. By default, Tomcat uses port 8080. When a port is being used, the URL always specifies the port number as part of the computer name, separated from the main name by a colon (:). If you have another server installed and running on your computer for instance, IIS for Windows or Apache for Mac by adding the 8080 port information, you're telling the browser to serve the page using Tomcat rather than that other server. This is how Tomcat and those other servers can coexist, running at the same time on the same system. |
Setting Up the Web Application
In plain English, a web application is an interactive web site built with JSP, ColdFusion, or any other server technology. Within the context of JSP, however, web applications are much more formal structures. For purposes of JSP, a web application is a folder, stored where the Java server can find it, where you put pages you want to be served. That folder includes a specific structure of subdirectories that contain any special-purpose files the server might need such as drivers, JavaBeans, and custom JSP tag libraries. Figure 31.8 shows the folder structure of a typical web application.
Figure 31.8. The directory structure of a web application folder.
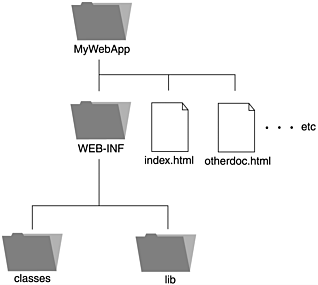
When you install Tomcat, its internal folder structure includes a web applications folder, where all application folders must be stored. In the basic install, several applications are already defined, including the main application, called ROOT, where the Tomcat home page is located.
Figure 31.9 shows the Tomcat folder structure, as it appears on Mac and Windows.
Figure 31.9. The Tomcat directory structure showing various web applications, including ROOT.
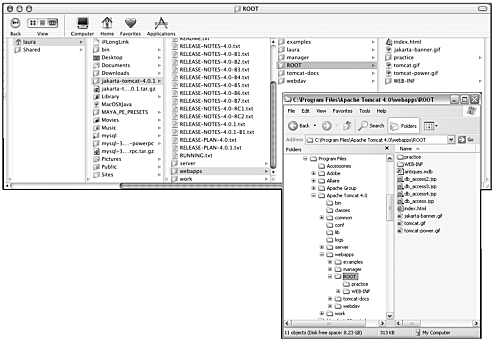
To set up a site in Dreamweaver, of course, you must define local and remote folders. To work on JSP sites in Dreamweaver, your remote folder should be a web application folder within the Tomcat directory structure. So creating a web application is a necessary pre-step to defining your Dreamweaver site.
Creating a Web Application in Tomcat
Creating a web application within Tomcat requires two steps: Create the web application folder, and add an entry to the server.xml file so that Tomcat will interpret the folder as a web application. To create the antiques web application for the exercises in this chapter, perform the following steps:
-
Create a folder in Tomcat's webapps folder. Name it antiques. This folder will contain your application, which will be built from any HTML, JSP, or other documents you create.
-
Within the antiques folder, create another folder called WEB-INF. This folder will eventually contain any Java files Tomcat must use to process your web application.
Note

Java is case-sensitive! For all folder and filenames, make sure your capitalization matches the capitalization shown here. Windows users will notice that your OS changes the "WEB-INF" folder name to lowercase. Don't worry about this so long as you originally typed it in uppercase.
-
Within the WEB-INF folder, create two more folders called classes and lib. The classes folder will eventually contain any Java class files that your site will use; the lib folder will contain any Java archive (JAR) files.
-
Next, you'll configure the server.xml file so that it recognizes your folder as an official web application. In the Tomcat folder, open the conf folder and find server.xml. Open this file in a text editor (or in Dreamweaver Code view).
There's a lot of information in there! Don't worry, you can ignore most of it. Scroll through the file until you find the <context> tags. Each <context> tag represents a web application. You're going to add a new context.
Find the <context> tag for the examples web application, and insert a few blank lines in front of it. Enter the following code:
<Context path="/antiques" docBase="antiques" debug="0" reloadable="true"> <Logger className="org.apache.catalina.logger.FileLogger" prefix="localhost antiques_log." suffix=".txt" timestamp="true"/> </Context>
After you've double-checked your typing, save and close the file.
Note

Confused by all this XML and Java? There's a wealth of information out there to learn more. The FAQ at JGuru (http://www.jguru.com/faq) is a good place to start.
-
Finally, because Tomcat reads only the server.xml file at startup, you must restart the Tomcat server so that it recognizes your web application.
-
On Windows, use go to Start > Programs > Apache Tomcat > Stop Tomcat, and Start > Programs > Apache Tomcat > Start Tomcat.
-
On Mac OS X, go to the Terminal window and type the following:
~/bin/stop_tomcat ~/bin/start_tomcat
(Make sure you wait for the % prompt to appear before typing each new line.)
-
Setting Up the Local Folder
After you've set up the web application, you have created your remote folder for Dreamweaver to use.
For your local root folder, copy the chapter_31 folder from the CD onto your computer. Its exact location doesn't matter for the exercises.
Setting Up the Database
The computer housing your web server must have a database management system (DBMS) installed on it. For development purposes, you can use Microsoft Access or MySQL with JSP. After you have the database in place, you also need to create a driver that connects to it.
Note
| | For instructions on setting up MySQL for Windows and OS X, see Appendix C, "Introduction to MySQL." |
The Antiques Database
The exercises in this chapter use the antiques.mdb database. It's available on the CD as an Access or MySQL database.
If you're using Access as your DBMS, open the databases folder on the CD, and copy the antiques_access folder to the computer where your web server is installed. You can store the folder anywhere you like. (It's not part of your site, so it doesn't need to be stored in the site folder. All that matters is that Tomcat can find it; and that gets taken care of when you define the driver.)
If you're using MySQL as your DBMS, see Appendix C for instructions on adding the antiques database to the MySQL server.
The Driver
The driver allows the application server to communicate with the database. It can be set up only after you've properly copied the database to your host computer. Java servers, such as Tomcat, require JDBC (Java Database Connectivity) drivers. Depending on your OS, database, and the level of effort you want to put in, you have your choice of using a JDBC-ODBC bridge driver or a standard JDBC driver.
JDBC-ODBC Bridge Driver (for Access or MySQL on Windows)
If your Tomcat server is on Windows, you'll have an easy time setting up the JDBC-ODBC bridge driver. As its name indicates, this driver acts like a translator, or bridge, between the Java server and the standard Windows ODBC driver. It's not the most elegant solution, from a programming standpoint, because it adds a whole extra layer of translation rather like flying from Florida to New York via Spokane. However, it's very easy to set up. To set up the bridge driver, follow these steps:
-
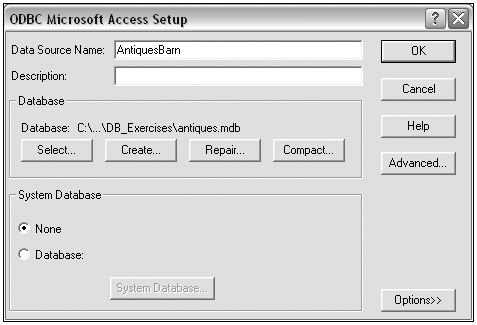
Create a DSN for your database, using the ODBC Control Panel. (See Chapter 26 for instructions on setting up a DSN.) Figure 31.10 shows a driver being created for the Access version of the antiques database.
Figure 31.10. Creating the AntiquesBarn database DSN (Windows, Access).
Note

One special rule when creating DSNs for JSP: Don't include the word driver in your driver name. This will cause problems.
-
That's it! Usually the second step is to install the JDBC-ODBC bridge driver, to allow the DSN to communicate with the Java server. However, this driver was installed along with your Java 2 SDK so you're all done! (If you're wondering where the bridge driver is, you can find it at J2sdk1.4.0\jre\bin\JdbcOdbc.dll.)
JDBC Driver (for MySQL on Windows or Mac)
If you're using MySQL as your DBMS you also have the option of using the open-source mm.mysql JDBC driver. Use this driver if your application server is not on Windows (for instance, if you're developing on Mac OS X or if you're connected to a remote server running UNIX), or if you're using MySQL on Windows and don't want to use the bridge driver. Although this is a straightforward, elegant solution from a programming point of view, it's more complex to set up than the preceding option.
-
Begin by downloading the driver by following the links from http://mmmysql.sourceforge.net/. As of this writing, the download file for the current release is mm.mysql-2.0.11-you-must-unjar-me.jar.
-
The file is a Java archive (JAR). As you can tell from its name, you need to unjar it. Although you can do this using the Command Prompt or Terminal window, the easiest solution is to use an archiving utility. Both WinZip (Windows) and StuffIt Expander (Mac) can unpack a JAR archive.
-
When unpacked, the archive contains a folder of support information, including a subfolder called mm.mysql.2.0.11, in which you will find another JAR file called mm.mysql-2.0.11-bin.jar. This file is the driver.
-
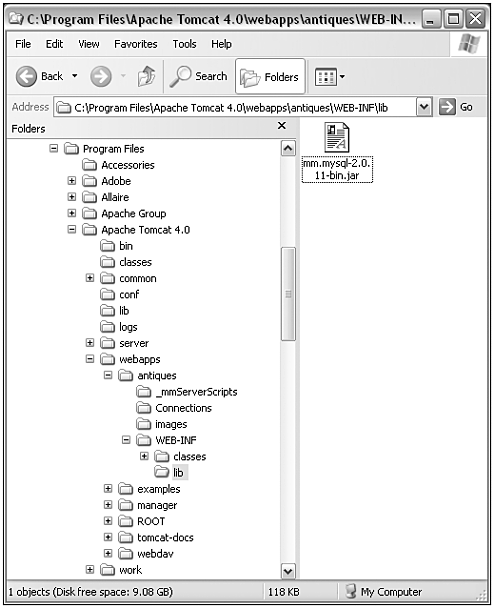
Put a copy of this file in the Tomcat folder, in your antiques/WEB-INF/lib folder. The driver is an archive your web application will use and must be stored here for Tomcat to access (see Figure 31.11).
Figure 31.11. The mm.mysql driver in position for use with the antiques web application.
Setting Up a JSP Site in Dreamweaver
After you've got your workstation files set up, it's time to tuck into Dreamweaver. The first step here is to define a site, complete with local, remote, and application server information. Dreamweaver needs to know where your local and remote folders are. It also needs to know what kind of dynamic site you'll be creating (JSP).
The main difference between using Dreamweaver for static and for dynamic sites is how it previews your pages. In a static site, when you choose Preview in Browser (F12), Dreamweaver launches the browser and passes it the local address of the current page:
C:\Client Files\Web\My Local Site\index.html
or
file:///Client Files/Web/My Local Site/index.html
In a dynamic site, it's not enough just to view the pages in a browser. Dreamweaver has to activate the web server, passing it an HTTP request so that it processes the files. This requires an address like this:
http://localhost:8080/mysite/index.html
or
http://192.128.164.123:8080/mysite/index.html
That's why, when you define a dynamic site, you must go through the additional steps of making sure Dreamweaver can connect with your server and "serve" your pages.
Exercise 31.1 Setting Up the Antiques Barn Site (JSP)
In this exercise, you define a dynamic JSP site in Dreamweaver, using the Site Definition dialog box. Make sure you've set up your workstation before going through the exercise.
-
In Dreamweaver, go to Site > New Site. In the Site Definition dialog box that appears, click the Advanced tab to bring it to the front.
-
From the categories, choose Local Info. Local site information for a dynamic site is no different from that for any site. Name your site Antiques Barn JSP. For the local root folder, browse to the chapter_31 folder you copied from the CD.
-
From the categories list, choose Remote Info. You'll enter different information here depending on how you set up your workstation (see the earlier discussion in this chapter).
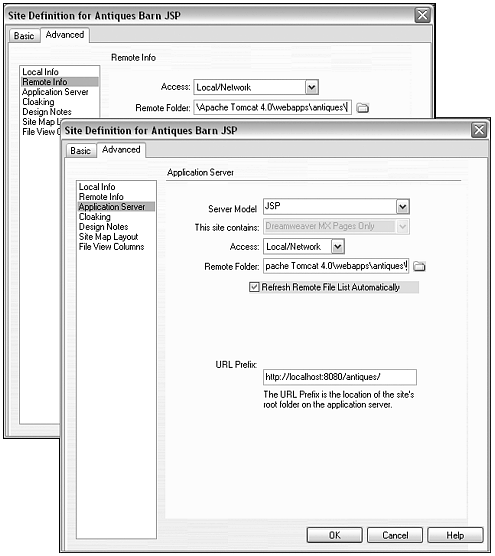
If you're working on the same computer that's running your web server, choose Local/Network access and browse to the shared remote antiques_jsp folder you defined earlier (see Figure 31.12).
Figure 31.12. The Remote Info and Testing Server setup for the Antiques Barn site, if your Dreamweaver site and your web server are on the same computer.
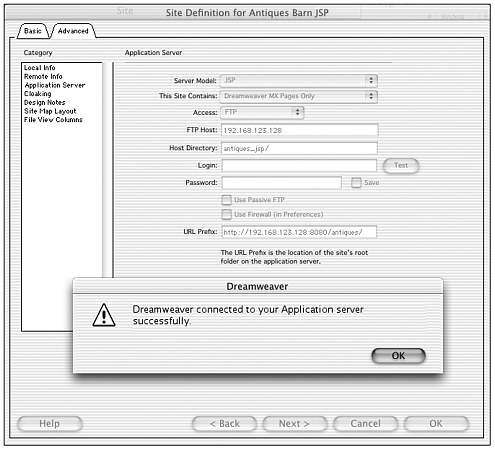
If you're connecting to a different computer for your web server, choose Local/Network access if you have a direct network connection; otherwise, use FTP access. Enter the IP address of the other computer, the name of the shared folder (FTP directory) being used for FTP on that computer, and username and password if needed (see Figure 31.13). To check your FTP connection settings, click the Test button.
Figure 31.13. The Remote Info and Testing Server setup for the Antiques Barn site, if your web server software is on a different computer than what your Dreamweaver site is on.
Refer back to the discussion on IP addresses in Chapter 26, if necessary.
Note

Mac users connecting to a Windows computer:You must use FTP access unless you have a Mac/Windows sharing utility like PCMacLan or Dave.
-
From the categories list, choose Testing Server. For server model and language, choose JSP. For access information, you must establish an FTP connection to the remote computer, even if your computers have a direct network connection. If you chose FTP access for the Remote Info section in the previous step, enter the same information here. If you entered Local/Network access in the previous step, you'll need to find the IP address and FTP directory of the remote computer to enter here, as well as the username and password if those are required (see Figure 31.13).
After you've done this, click the Test button to see whether you entered your settings correctly. (If you can't connect successfully, double-check everything IP address, folder name, username, and password.)
Also in this screen, examine the URL Prefix field. Dreamweaver should have filled in this information based on your previous entries, but you might need to add the port information (:8080). If you're working on one computer, the address should be localhost:8080/antiques_jsp/ or 127.0.0.1:8080/ antiques_jsp/. If you're working on two connected computers, the address will be the same as this, but using the host computer's IP address. This is the URL information Dreamweaver will use every time you preview your pages in the browser. It must be correct!
When you think all the site information is correct, click OK to close the dialog box. It's time to test things out.
-
From your local root folder, open index.html, and Preview in Browser (F12). You're probably in for a nasty surprise. Either the page will display with broken images, or you'll get a File Not Found error. Why is this happening?
When you're working on a dynamic site, Dreamweaver uses the remote folder to generate its previews. (As explained earlier, this has to happen, so that the page can be served, instead of merely being viewed.) Currently, there's nothing in your remote folder! You must get in the habit of uploading files to the remote folder before previewing.
Note
| | Actually, it's a simplification to say that Dreamweaver uses the remote folder to generate its previews. Dreamweaver uses the files in the application server to generate previews. For the exercises in this book, however, the remote folder and the application server folder are the same folder. As you get more advanced in your work with live data sites, this might not always be the case. |
In the Site panel, select all the files in your site and click the Put button to upload them all. Then try previewing again. If you entered the correct information in your Site Definition dialog box, you will be able to preview the page. The browser's address field will show the http:// address of the home page, not its file location on your computer. (If you can't preview, keep double-checking those site settings until you can. You can't keep working in Dreamweaver until you get this part right.)
Advanced JSP Features in Dreamweaver
A JavaBean is a Java class file that the JSP document can call on and execute to help create the final dynamic HTML page. (You can think of a class file as a very small application, or a module that might go into creating a Java application.) You also can insert same kind of code that goes into a JavaBean directly into the JSP page, between <% %> tags. Because it's placed in a separate bean file, however, it can be called on by many different documents, which is efficient for updating. Also, because the code is not contained in the main document, it makes that document's code easier to read. Dreamweaver cannot create JavaBeans for you; if you have them already created, however, you can use the Components panel to call on them from your JSP pages. A custom tag library is a set of HTML-like tags that accomplish JSP tags. The tags are defined in external documents that explain what Java function should occur whenever the tag is used in a JSP document. If you have custom JSP tags defined, your page can be built from easy-to-read chunks such as <jsp:myTag>...</jsp:myTag>, instead of the complex scripting code enclosed in the <%...%> tags. The Dreamweaver Tag Library Editor enables you to import the documents where JSP tags are defined and then use those tags in your JSP pages. Both JavaBeans and custom tag libraries enable web developers to separate the scripting from the main JSP document, making it easier for development teams to split into programming and design groups. |
Interview: Harlow Pinson
Business Name: Indepth Learning
URL: www.indepthl.com
Harlow Pinson is founder of Indepth Learning, a company that provides web and multimedia publishing, hosting, and development services. Their current work focuses on providing large-scale and dynamic web-content management systems for state government and small business. He teaches Dreamweaver and UltraDev privately and at the University of New Mexico.
Your specialty is back-end web development. Do you design the front-ends, as well, or do you collaborate on your projects?
Yes, I do design front-ends, but prefer to collaborate. I work with folks who are talented graphic artists and site designers, and let them do what they do best. My talent is programming and web server administration. This exchange of complementary skills can be very productive. There is so much to know, and it is important to recognize your own talents and limits. I know when to call for help and where to find it.
I do generally insist that people I collaborate with follow a formal development process, which is proven successful for developing dynamic data-driven web sites. The process is this:
-
Understand the problem. (This is the hard part.)
-
Build a text-only prototype.
-
Critique the prototype.
-
Refine the prototype.
-
Add graphics without changing the interface.
This process seems to make sense to those coming from a functional design background. Generally what I am asked to do is not art, and I have the best collaborative relationship with front-end designers who are comfortable with such an iterative design process. I also am convinced this makes for the best large web sites.
You've worked with all the major application servers. In your opinion, what differentiates JSP as a platform? Why would someone choose that? What are its limitations?
Well, not all of them!
I guess I take a practical approach to answering this question. I'm not going to get into the religious merits of using Java over xyz technology. Java is a powerful platform, and you can probably do what you need to with it.
Until recently, cost was a big reason for not choosing JSP. An enterprise implementation of the IBM WebSphere or JRun application server was prohibitively expensive and the open-source alternatives were not completely stable, at least in the Microsoft Windows environment where I mainly work. The newest stable version of the Apache/Jakarta Tomcat JSP server changes this. The venerable open-source movement has brought us another great free equivalent to the commercial products. Now a kid can set up a web site and Java application server on her Pentium 133 and DSL connection.
One practical reason for choosing JSP and Java is that there are not that many Java programmers around. There is lots of work out there, especially at the government and corporate levels. Java is an established technology and you are securing yourself a career, for at least the next few years, by learning it. If you are a fair-to-excellent Java programmer, and can cooperate in a team environment, you will probably get very good paying work. This is unlike the web design market, which seems crowded.
A limitation is that Java is not so easy to learn, comparatively speaking, for a person with a design and not a programming background. If you find JavaScript to be too challenging, Java development is probably not for you. If you come from the multimedia world of visual development tools like I do (Authorware and Director), you might find Java to be both very limiting and very powerful and exciting at the same time.
The best introduction that I know of to the JSP platform and Java is called JSP, Servlets, and MySQL, by David Harms (ISBN 0764547879).
In your opinion, what are the advantages and disadvantages of using Dreamweaver/ UltraDev as a development tool for working with data-driven web sites?
I think the best reason to use Dreamweaver is as a tool to learn how to program the core technologies it supports SQL, ColdFusion, JavaServer Pages, Active Server Pages, and now PHP. Use it as a learning tool, but expect at some point to outgrow it.
You can perform tasks such as creating a database interface, quite quickly. An example of a simple database interface would be web pages that enable you to view, edit, add, and delete database records. Dreamweaver enables you to become productive quickly without knowing relatively much about web database programming.
To get started, however, you still have to know a lot! You have to know about operating systems, web servers, security, databases, and ODBC connectivity. That's quite a bit of background knowledge, and I typically take two days to cover this background in the classes that I teach. Some people get hung up here and never get to the point where they can actually get Dreamweaver's dynamic features to work.
A big disadvantage of using Dreamweaver for database development is that it encourages a black-box mentality in developers. As Phillip Greenspun says, "There is no magic programming bullet" (www.arsdigita.com/books/panda/databases-intro). When your Dreamweaver-generated code breaks, which it will, you have to be willing to roll up your sleeves and understand what it is that the program is doing behind the scenes.
Some are willing to do this and some are not. Those who are will be successful at web back-end development. Others will get frustrated, because the Java code that Dreamweaver writes is not exactly simple nor is it easy to understand. Many users also have experienced this with the provided JavaScript behaviors; when they break or do not do what you want, they are often a challenge to fix or modify. Dreamweaver-generated server-side scripting magnifies this problem immensely.
Another critique is that Dreamweaver does not, for the most part, separate presentation, logic, and content. The designer and programmer will still tangle their feet, especially when neither has a good idea of how the other works. Likewise, Dreamweaver encourages spaghetti coding, the bane of programmers since the 1960s, and does not take true advantage of the object-design capabilities inherent to the Java platform. True Enterprise JSP encourages separation of content, presentation, and logic. You can certainly get UltraDev to do this sort of thing with some modification.
Are you a Java programmer? Is it possible to do serious work with JSP, without knowing Java?
No, I would not consider myself a Java programmer. Out of necessity, I use the programming environment driven by any particularly project, and sometimes that is Java. Rarely do I have the luxury to choose. Given that, I can write Java if I need to, and know when and where to get help. Dreamweaver has made the transition to Java on any particular day much easier for me.
Dreamweaver certainly makes the database interface development process much easier, but keep in mind that I can also make a big mess if I rely on the code that the program produces. That code may or may not be optimal and appropriate for the problem at hand. Integration with other ways of doing things can be difficult.
Serious work? No, I would probably not bring Dreamweaver into a multideveloper production environment. If I were a single-person shop, however, and had to personally fulfill a number of developer roles, I would use it extensively. That's often the case with my own company, and I definitely use the tool enough to justify its cost.
How closely involved are you with the server setup for the web sites you develop? Would you say that's typical for a web developer using database connectivity?
I think it essential for someone doing web database work to understand how the industry standard operating systems (Windows, UNIX), web servers (IIS, Apache), and databases (MySQL, Microsoft Access) work, and how to operate them. Otherwise, when things go wrong you are in deep and expensive trouble.
Typically a web database developer wears many hats: systems administrator, web server administrator, database administrator and designer, programmer, and interface designer. In my career I have attempted to learn enough about each of these areas to function in that role. In my classes at the University of New Mexico, we spend a lot of time learning about these roles, simply because the typical student has not been exposed to them, and they are part of the everyday life of a dynamic web site developer.
Other than Dreamweaver, what development tools do you use?
My programming language of choice is Python (www.python.org) and application server environment is Zope (www.zope.org)
Why? These are the closest to a cross-platform, object-oriented language and application server that I've seen, despite Java's claims and they are both free. Of course, you spend time learning these, and time is money.
To clarify that: I don't need any special brand of (Sun, IBM, Microsoft, and so on) Java virtual machine to get things to work. I just use the Python interpreter that works well on Linux, Windows, Mac OS, AIX; whatever! This is just like what Perl (www.perl.org) has been doing for years, with little marketing hype like Java had. Syntactically, Python is a clean language and much easier to learn than is Java. And, unlike with Perl, I can understand what I've written six months later.
My favorite application server platform is the free and open-source Zope. It is a true object-oriented web application environment, and the first that I've used that enables you to cleanly separate presentation, logic, and content. What this means is that the programmer and the graphic designers inhabit separate spaces, and don't clobber each other. Macromedia Spectra is a similar platform, based on ColdFusion, but the price tag is much higher. Certainly Zope has rough edges, and it is such a paradigm shift that it's hard to find designers, who are used to things such as file systems, who are willing to try to understand it. It requires a very different way of thinking: the web as a group of interrelated and callable objects and services. It's kind of like moving from BASIC to modular C++ in terms of how you think and work.
What advice would you give to a web designer just getting into working with data-driven web sites?
Dreamweaver is a great place to start a career in dynamic web site publishing, especially if you have no or little programming background. Use it to experiment and learn. Dreamweaver does the programming for you, and you can examine what is produced and use it as a model.
Also use it to perform the repetitive chores of simple web database interface design. It can save you time, at an understandable cost of optimization and flexibility.
Have a thorough understanding of the web editor of your choice; know a basic image editor such as Photoshop; play with a database such as Microsoft Access or MySQL; and install an inexpensive server class operating system and web server such as Linux and Apache yourself. Read all that you can online and in books, lurk in newsgroups, and hang out with people who are doing this kind of work.
Finally, like my music teacher always said, "Get back to the woodshed and practice." This, of course, takes a large investment of your own time, but like most investments, pays off handsomely in the end.
Setting Up a Database Connection
In JSP terms, the database connection is a script that calls on the driver to talk to the database. Dreamweaver creates this script for you, and stores it in a special connections file, when you choose data source name (DSN) from the Databases panel. Because this information gets stored in a special file that can be accessed by any JSP page in your site, you have to define the connection only once for the entire site. (And if you update the information later for instance, when moving the site to a different server you have to update it only once.)
Exercise 31.2a Creating a Database Connection (JDBC-ODBC Bridge Driver)
In this exercise, you create the connection script that will allow your pages to communicate with the antiques database. You must already have installed your database and created a driver for it (as outlined in the preceding section) before continuing with this exercise. Only do this exercise if you want to use the JDBC-ODBC bridge driver for your database. If you want to use the mm.mysql JDBC driver, do exercise 31.2b instead.
-
Because Dreamweaver has to know what kind of connection to create, you must have a dynamic document open before you can create the connection. From your local site, open catalog.jsp.
Take a look at the page in Code view, and you'll see that so far it contains only standard HTML code.
-
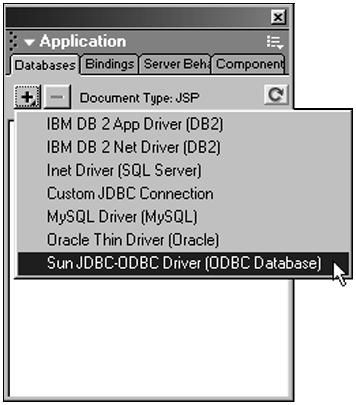
From the Application panel group, open the Databases panel. If you have catalog.jsp open, the panel will have a plus (+) button at the top. Click the plus (+) button and, from the pop-up menu, choose Sun JDBC-ODBC Driver (ODBC Database). Figure 31.14 shows this happening.
Figure 31.14. Choosing a JDBC-ODBC bridge driver for a database that already has a DSN.
-
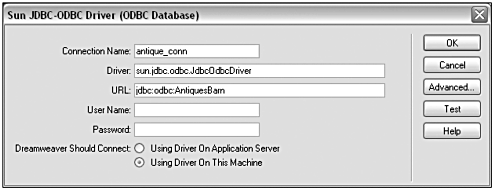
The JDBC-ODBC Driver dialog box will appear. For your connection's name, enter antiques_conn. (The connection name will be used in the connection script. It's common practice to include con or conn in the name.)
-
The driver field should already be filled in as sun.jdbc.odbc.JdbcOdbcDriver. The URL is partially filled in, with placeholder text for the name of the DSN.
Jdbc:odbc:[odbc dsn]
To complete this entry, replace the placeholder text (and the brackets) with the name of your DSN (whatever name you gave the DSN in the ODBC Drivers Control Panel), like this (new code in bold):
Jdbc:odbc:AntiquesBarnWhat you're doing here is creating a bridge driver that points to the existing ODBC driver (the DSN).
Figure 31.15 shows this happening.
Figure 31.15. Completing the JDBC-ODBC Driver dialog box by entering the DSN that already exists for the antiques database.
-
If you specified a name and password when you defined the driver, enter them here. Otherwise, you can leave these fields blank.
-
To make sure Dreamweaver can connect to the driver, select the radio button for Using Driver on This Machine.
-
Before leaving the Data Source Name dialog box, click the Test button. If Dreamweaver can find the driver, you'll get a Connection Successful message. The most common reasons for failing the test are incorrect names and passwords, and incorrectly entered DSNs. After you've passed the test, click OK to close the dialog box.
Note

If you have NEO installed on your computer, when you try to connect a prompt will appear asking if you want to allow NEO to map the virtual directory for you. Choose No or there will be a conflict.
-
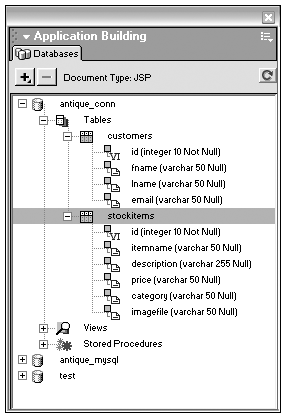
The Databases panel will now contain an icon representing your connection. (Congratulations!) You can now use this panel to explore your database. Expand the connection icon to see Tables, Views, and Stored Procedures. The antiques database contains only tables. Expand the Tables icon all the way to see that the database contains two tables stockitems and customers and to see what columns (information fields) each table contains. You can't see the records stored in the database from here, but you can examine its structure (see Figure 31.16).
Figure 31.16. The Databases panel showing the structure of the antiques database.
-
In the Site panel, examine your local root folder. You'll see a new Connections folder. Inside that folder is the antique_conn.jsp file. That file contains your connection script. Each file in your site that needs to access the database will link to it. Open antique_conn.jsp and examine it in Code view, and you'll see the connection script:
<% // FileName="sun_jdbc_odbc_conn.htm" // Type="JDBC" "" // DesigntimeType="JDBC" // HTTP="false" // Catalog="" // Schema="" String MM_antique_conn_DRIVER = "sun.jdbc.odbc.JdbcOdbcDriver"; String MM_antique_conn_USERNAME = ""; String MM_antique_conn_PASSWORD = ""; String MM_antique_conn_STRING = "jdbc:odbc:AntiquesBarn"; %>
You don't need to know what everything in this code means. However, one important piece of syntax that you should get familiar with is the <%...%> tags. All JSP code is contained within these tags. Whatever code is inside the tags must be valid Java. When the application server processes this page, it looks for these tags and executes all code inside them. All other code on the page is assumed to be regular HTML or client-side scripting, and is just passed back to the browser.
Exercise 31.2b Creating a Database Connection (mm.mysql JDBC Driver)
In this exercise, you create the connection script that will allow your pages to communicate with the antiques database. You must already have installed your database before continuing with this exercise. Only do this exercise if you are using the MySQL version of the antiques database and want to use the mm.mysql JDBC bridge driver. If you want to use the ODBC-JDBC bridge driver, or if you're using the Access database, complete Exercise 31.2a instead.
-
Because Dreamweaver has to know what kind of connection to create, you must have a dynamic document open before you can create the connection. From your local site, open catalog.jsp.
Take a look at the page in Code view, and you'll see that so far it contains only standard HTML code.
-
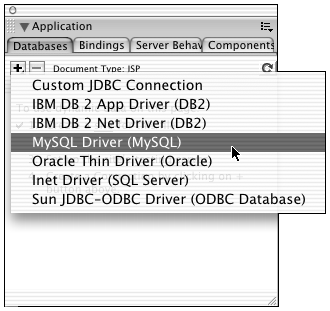
From the Application panel group, open the Databases panel. If you have catalog.jsp open, the panel will have a plus (+) button at the top. Click the plus (+) button and, from the pop-up menu, choose MySQL Driver (MySQL). Figure 31.17 shows this happening.
Figure 31.17. Choosing the mm.mysql JDBC driver for use with a MySQL database.
-
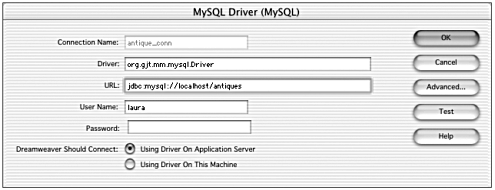
The MySQL Driver dialog box will appear. For your connection's name, enter antiques_conn. (The connection name will be used in the connection script. It's common practice to include con or conn in the name.)
-
The Driver field should already be filled in as org.gjt.mm.mysql.Driver. The URL is partially filled in, with placeholder text for the name of the DSN.
jdbc:mysql://[hostname]/[database name]
To complete this entry, replace the [hostname] placeholder text with localhost and the [database name] placeholder with the name of your database. Like this (new code in bold):
jdbc:mysql://localhost/antiques
What you're doing here is telling the driver (which is a generic driver that can point to any database) where your particular database is on the same computer where the driver is stored, in the MySQL installation, called antiques.
Figure 31.18 shows this happening.
Figure 31.18. Completing the MySQL JDBC Driver dialog box by entering the location of the antiques database.
-
If you set up your MySQL database following the instructions in Appendix C, you can leave the Username and Password fields blank. (Those instructions gave any user on localhost permission to access the antiques database.)
-
From the radio buttons at the bottom of the dialog box, choose Using Driver on Application Server.
Note

Why must you use the driver on the application server? If you followed the instructions earlier in this chapter, you installed the mm.mysql driver inside the Tomcat folder, in your web application folder. Even if the Tomcat folder is on your working computer, technically it is the application server.
-
Before leaving the dialog box, click the Test button. If Dreamweaver can find the driver, you'll get a Connection Successful message. The most common reasons for failing the test are incorrect names and passwords, and incorrectly referenced databases and host names. After you've passed the test, click OK to close the dialog box.
Note

Mac OS X users take special note here: Because of how UNIX permissions work, permission errors are the most common problems in establishing your database connection. If you get an error when you test your connection, try entering your Mac OS username in the dialog box's Username field, and even your password, if needed.
-
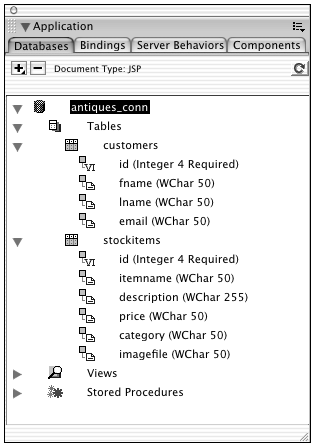
The Databases panel will now contain an icon representing your connection. (Congratulations!) You can now use this panel to explore your database. Expand the connection icon to see Tables, Views, and Stored Procedures. The antiques database contains only tables. Expand the Tables icon all the way to see that the database contains two tables stockitems and customers and to see what columns (information fields) each table contains. You can't see the records stored in the database from here, but you can examine its structure (see Figure 31.19).
Figure 31.19. The Databases panel showing the structure of the antiques database.
-
In the Site panel, examine your local root folder. You'll see a new Connections folder. Inside that folder is the antique_conn.jsp file. That file contains your connection script. Each file in your site that needs to access the database will link to it. Open antique_conn.jsp and examine it in Code view, and you'll see the connection script:
<% // FileName="mysql_jdbc_conn.htm" // Type="JDBC" "" // DesigntimeType="JDBC" // HTTP="true" // Catalog="" // Schema="" String MM_antique_conn_DRIVER = "org.gjt.mm.mysql.Driver"; String MM_antique_conn_USERNAME = "laura"; String MM_antique_conn_PASSWORD = ""; String MM_antique_conn_STRING = "jdbc:mysql://localhost/antiques"; %>
You don't need to know what everything in this code means. However, one important piece of syntax that you should get familiar with is the <%...%> tags. All JSP code is contained within these tags. Whatever code is inside the tags must be valid Java. When the application server processes this page, it looks for these tags and executes all code inside them. All other code on the page is assumed to be regular HTML or client-side scripting, and is just passed back to the browser.
Note
| | Why put the connection in its own file? If you ever change your driver's name, type, or location, Dreamweaver needs to change only this one file, and the updated driver information will automatically be passed along to all documents in the site. |
Displaying Dynamic Data
Probably the most basic task you'll want your JSP pages to perform is to display information from a database. This involves creating a framework of static page elements (banner, navigation controls, a table for layout, and so forth) and adding dynamic text and pictures like a catalog page in a commerce site shows pictures and descriptions of items for sale.
Displaying dynamic data involves several tasks. First, you must query the database to collect the information you want to display (which records, which fields, in what order, and so on). This collected information is called a recordset. Then you create a dynamic element for every field you want to display. (A field is a column in one of the database tables, remember.) Then, unless you want your page to display only information from the first record it finds, you must create special code that steps through all the collected records and displays them one after the other. In Dreamweaver language, this is called creating a repeating region, and it can be refined through various recordset navigation controls.
Collecting a Recordset
In Dreamweaver, you collect a recordset with the Bindings panel, in the Application panel group. To collect the recordset, follow these steps:
-
Open the Bindings panel, click the plus (+) button and choose Recordset (Query).
-
In the Recordset dialog box that opens, choose whatever database elements (usually table columns, which translate into record fields) you want.
Note

When you choose items in the Recordset dialog box, you're actually telling Dreamweaver how to write a SQL query for you. To see the actual SQL syntax, click the Advanced button and examine the SQL input field. (Click the Simple button to get back to the standard dialog box.) See the preceding chapter for more on SQL.
-
After you've collected the recordset, the collected columns will appear in the Bindings panel. Because Dreamweaver has to write a JSP script to collect the recordset, technically speaking the collection action is a behavior. It will appear in the Server Behaviors panel (in the Application panel group).
You also can create a recordset by going to the Application tab of the Insert bar and choosing the Recordset object. Doing this is exactly the same as using the Bindings panel. Think of it as a shortcut.
Exercise 31.3 Collecting Data for the Antiques Barn Catalog Page
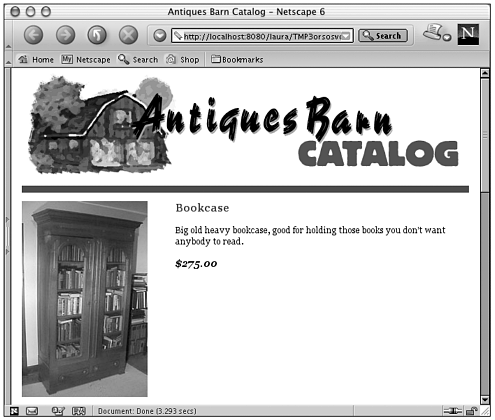
In this exercise, you add dynamic elements to the catalog.jsp page, which already has its static layout elements in place. This page is meant to display all the items for sale at the Antiques Barn, so you'll collect information from the stockitems table of the antiques database. You'll display a picture, name, description and price for each item (see Figure 31.20).
Figure 31.20. The Antiques Barn catalog page being served with one record displaying.
-
Begin by opening catalog.jsp. Examine the layout structure in Design view, and you'll see that the middle row of the main layout table is ready and waiting for a picture in one column, and various text items in another.
-
First, you have to query the database to collect some data to play with. From the Application panel group, open the Bindings panel. Click the plus (+) button and, from the menu, choose Recordset (Query). The Recordset dialog box appears.
-
You can give your recordset a custom name, or accept the default name. (For the examples shown here, the default name will be used.) If your DSN connection (antiques_conn) doesn't automatically appear in the Connections field, choose it from the pop-up menu. That will populate the rest of the dialog box with information from the antiques database.
-
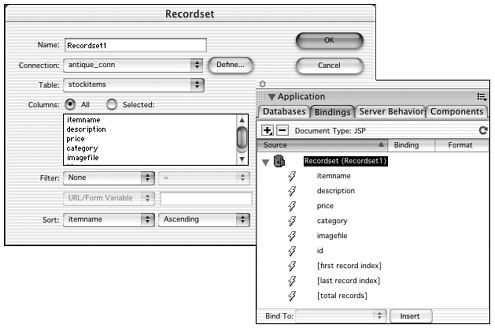
You want information from the stockitems table, so choose it from the Tables pop-up list. You don't need to collect all the columns (fields). For columns to choose, select the Selected radio button. Then Ctrl/Cmd-click to choose itemname, description, price, and imagefile. Choose to sort the information based on itemname, ascending (from A Z).
Figure 31.21 shows the completed dialog box, and resulting Bindings panel.
Figure 31.21. Collecting the recordset for the Antiques Barn catalog page, and the resulting Bindings panel.
Tip

From within the Recordset dialog box, click the Test button to see what information your recordset will collect. This is a handy way to make sure you've collected the proper set of data, before you get too far into the process of making the page.
-
Click OK to close the dialog box. The Bindings entry is made and the appropriate code added to your page.
Inserting Dynamic Elements
Data from the database can be inserted anywhere in your document. Names, prices, and descriptions can become dynamic text elements you can even format them using all the standard HTML and CSS text options. You also can use database fields behind the scenes to help construct the HTML code of your page. Therefore, although most databases can't contain images or other media elements, a field might contain a filename that can be used in the src parameter for an <img>. This is how you insert dynamic images into your pages. (For details on creating dynamic text, see the dynamic data sidebar in Chapter 4, "Working with Text." For more on dynamic images, see the sidebar in Chapter 5, "Working with Images.")
Note
| | Most databases used for dynamic sites can't contain actual media, such as images or sound files. They can contain only text. |
Exercise 31.4 Displaying Dynamic Data in the Antiques Barn Catalog Page
In this exercise, you use the recordset you collected in the preceding exercise to create dynamic text and image elements for catalog.jsp. You also familiarize yourself with the Live Data previewing options in Dreamweaver.
-
Open catalog.jsp, if it's not already open. In the Application panel group, open the Bindings panel and expand the view of your recordset so that you can see the individual fields you have collected.
-
It's easiest to start with the dynamic text elements. As you can see from 31.20, the rightmost column of the layout table should contain the item name, description, and price, each in its own paragraph.
Inserting a dynamic text element can be done in various ways. By far the simplest is just dragging the desired field from the Bindings panel to the proper place in the Document window. Try that method for the first text element drag the itemname field into the layout table (see Figure 31.22).
Figure 31.22. Inserting a dynamic text element by dragging a field name from the Bindings panel.
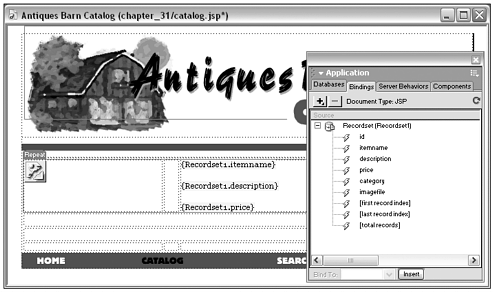
After in the document, the dynamic element becomes a text placeholder. In Design view, it looks like {Recordset1.itemname}. Switch to Code and Design view, and you'll see that the JSP code looks like this:
<%=(((Recordset1_data = Recordset1.getObject("itemname"))==null || Recordset1.wasNull())?"":Recordset1_data)%>You should already recognize the JSP tag structure. The <%= tag means "insert the following value here." The code in parentheses refers to the itemname column. When the server sees that code, it will substitute whatever text is in that field for the current record.
-
As far as Dreamweaver is concerned, this item is a stand-in for real text. To demonstrate that, stay in Code and Design view but use Design view to select the new placeholder. From the Property inspector, apply paragraph formatting (choose Paragraph from the Format pop-up menu). Note that, in the code, the placeholder is now surrounded by <p> tags (shown in bold):
<p><%=(((Recordset1_data = Recordset1.getObject("itemname"))==null || Recordset1.wasNull())?"":Recordset1_data)%></p>
From the Design panel group, open the CSS panel. With the placeholder text still selected, choose the itemname style class. The display changes to accept the new formatting, and your code changes to the following:
<p class="itemname"> <%=(((Recordset1_data = Recordset1.getObject("itemname"))==null || Recordset1.wasNull())?"":Recordset1_data)%> </p>The placeholder is being treated as though it were real text.
Use the same method to insert the description and price into the layout, each in its own paragraph in the table cell. For the price, apply the price CSS class.
-
When you insert dynamic text, you're actually creating a JSP server-side behavior (a script that tells the server to insert certain text). In the Application panel group, open the Server Behaviors panel, and you'll see one behavior for every dynamic text element you've added plus a behavior for collecting the recordset (see Figure 31.23).
Figure 31.23. Dynamic text elements in catalog.jsp, and the server behaviors used to insert them.
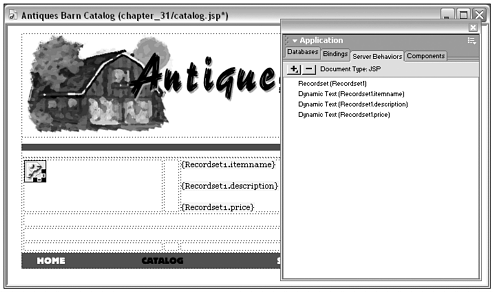
Just like regular behaviors, you can double-click a server-side behavior in the panel to view its properties and edit it.
You can use the Server Behaviors panel to apply special formatting to dynamic text elements things such as changing capitalization and decimal-point display. For the Antiques Barn catalog page, you probably want the item price to display a little nicer, with a dollar sign and some decimal values.
In the Server Behaviors panel, double-click the entry for the price, to open it for editing. In the dialog box that appears, use the Formatting pop-up menu to choose Currency Default (see Figure 31.24).
Figure 31.24. Adding scripted formatting to a dynamic text element.
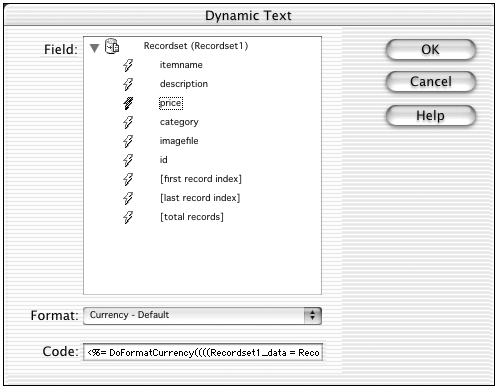
Click OK to close the dialog box.
Tip

To delete any dynamic element in a document, it's safest to delete the server behavior that created the element, instead of just selecting its placeholder in Design view and deleting. (Dreamweaver will warn you if you try to delete an element the wrong way.)
-
Each catalog entry also must show a picture of the item. A look at the structure of your database (in the Databases panel) will show you that the stockitems table has a field called imagefile. These can be used as the src attribute of an <img> tag, to create dynamic images.
To insert the dynamic image, start by placing your cursor in the page at the location you want to add the image and insert the image as you normally would (use the Image object from the Common tab of the Insert bar). When the Insert Image dialog box appears, however, choose the Data Source option (see Figure 31.25). The list of image files is replaced with a list of fields from your recordset. Choose imagefile, and click OK.
Figure 31.25. Inserting a dynamic image by specifying Data Source, rather than File System, for the src attribute.
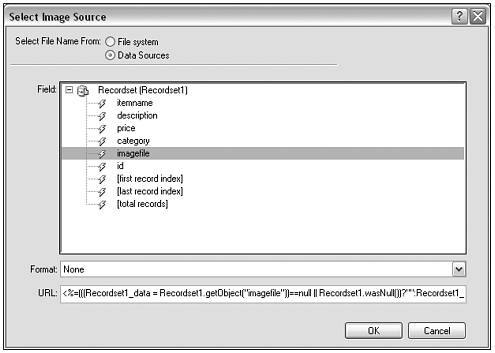
Design view now shows the image as a cute little image placeholder icon (with a lightning bolt for dynamic data). If you check your code, you'll see another JSP <%= tag stuck right in the middle of the <img> tag (non-JSP code shown in bold):
<img src="<%=(((Recordset1_data = Recordset1.getObject("imagefile"))==null || Recordset1.wasNull())?"":Recordset1_data)%>">
Note that no width or height has been entered. That's because Dreamweaver cannot determine the dimensions from this data because no actual image has been put here yet.
Previewing with Live Data
You're tired of placeholders! You want to see this page in action. After you've completely set up your site definition, Dreamweaver can send an HTTP request to your server and show you your page, with "live" data in place. As discussed earlier, the live preview originates from the remote folder you set up as your web application folder. So all image files must have been uploaded to the remote site before the preview will work properly. After you've done that, there are two ways to preview data:
-
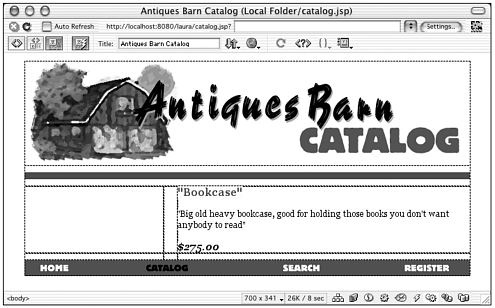
Live Data view. In the Document toolbar, click the Live Data button to switch from viewing placeholders to viewing actual data (see Figure 31.26).
Figure 31.26. Live Data view of catalog.jsp.
-
Preview in Browser. Choosing this command, when you're in a dynamic site, will activate the server and "serve" your page in your primary, secondary, or other browser.
Exercise 31.5 Previewing and Troubleshooting Live Data in the Antiques Barn Catalog Page
In this exercise, you try some different previewing methods (if you haven't already experimented!), and use them to troubleshoot your code.
-
Before trying to preview, make sure you've uploaded all your site's files to the remote server including the Connection folder that was created in Exercise 31.2.
-
With catalog.jsp open, click the Live Data view button. It might take a moment, but real data should pop into your Document window.
Note

Sometimes Dreamweaver holds the database connection open, which doesn't allow the Live Data view or previewing dynamic pages to function properly. If Live Data view does't engage properly, try saving the page and closing Dreamweaver. Next, open your browser and type http://localhost/yoursitename/catalog.asp and see if it displays. If you still get and error, your site probably isn't cnfigured properly and you'll need to revisit the previous exercises and Chapter 26 to troubleshoot.
You'll immediately notice that there's a problem your lovely dynamic image isn't displaying properly (see Figure 31.27).
Figure 31.27. Live Data preview of catalog.jsp but there's a problem with the dynamic image.
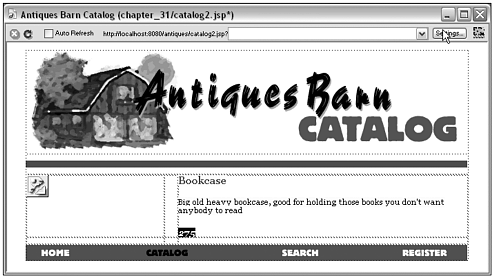
You might have guessed why, but in case you haven't, it's time to visit the browser.
-
Click the Live Data icon to toggle Live Data view off.
-
Preview your page in the browser (F12). You'll undoubtedly see the same problem a missing image. Here in the browser, however, you have some troubleshooting tools at your disposal. If you're in Internet Explorer, go to View > Source. If you're in Netscape, go to View > Page Source.
Examine the code here you might notice that it looks different from the code you viewed in Dreamweaver. There are no JSP <%...%> tags. That's because the server has executed the script within those tags and used it to construct plain old HTML. The HTML code that was constructed to display your table row looks like this (dynamically generated code shown in bold):
<tr valign="top"> <td><img src="bookcase.jpg"></td> <td> </td> <td> <p class="itemname">Bookcase</p> <p> Big old heavy bookcase, good for holding those books you don't want anybody to read. </p> <p class="price">$65.00</p> </td> </tr>
There's your dynamic text! And there's your problem, in the <img> tag. If you examine your site's file structure, you'll see that all images have been stored in an images folder, so the correct relative URL to the clock image is images/ bookcase.jpg. However, the database entry doesn't include that extra folder name. No wonder the browser cannot find the image!
-
You could, of course, fix every single database entry to include a folder name. However, it's much easier to tweak your JSP code, just a little, to do the job for you. When you get used to the way the server just adds the placeholders right into the main code, it'll be easy.
Back in Dreamweaver, select the dynamic image placeholder. Then open the Server Behaviors panel. The behavior that is creating your image will be highlighted. Double-click to open the editing dialog box. Because you know you have to add the folder name to the entry, manually fix the URL entry so that it looks like this (new code in bold):
<img src="images/<%=(((Recordset1_data = Recordset1.getObject("imagefile"))==null || Recordset1.wasNull())?"":Recordset1_data)%>"> -
After you've done this, try previewing your page in a browser again. The image should show up! (If it doesn't, View > Source to check your constructed code; and, back in Dreamweaver, check Code view to make sure your <img> tag looks exactly like the one shown here.)
Note
| | The only drawback to manually adding relative path information to your dynamic image source is that you have to know what the relative URL to your images should look like. You can't just browse to an image and let Dreamweaver do the thinking for you! |
Displaying Multiple Records with Repeated Regions
A repeated region is any chunk of page code that you want to repeat for as many records as you want to show. A repeated region can be a line of text, an item in a list, a table row, or even an entire table. To create a repeated region, follow these steps:
-
Select the part of your page that you want to repeat.
-
In the Server Behaviors panel, click the plus (+) button and choose Repeat Region; or choose the Repeat Region object from the Insert > Application bar (see Figure 31.28).
Figure 31.28. The Repeated Region, Recordset Navigation Bar, and Recordset Navigation Status objects.

A dialog box will appear, asking which recordset you want to display and how many records you want to show. (Only choose to display all records if you know for sure your database won't have too many records to fit on a decent-sized web page.)
Navigating Through Multiple-Page Displays
If you've set up the repeating region not to display all records at once, you need to give your visitors a way to view the first group of records, the next group after that, and so on. Dreamweaver offers two tools to help with this: Record Navigation Bar and Record Navigation Status. Both are technically server behaviors, but also are easily accessible as objects from the Applications tab of the Insert bar (see Figure 31.28).
The Record Navigation Bar object (or server behavior) determines whether the recordset contains more records than are displayed on the current page; and if so, displays previous page, next page, first page, and last page navigation controls. All the hard work is done for you. All you have to do is insert the object (or server behavior), and Dreamweaver creates the links and adds the scripting to display different records on your page.
The Record Navigation Status object (or server behavior) determines how many total records are in the recordset, and which are currently displaying on the page, and adds a text message to the page Records 1 to 10 of 56. Again, all you have to do is insert the object, and Dreamweaver takes care of the rest.
Exercise 31.6 Displaying Multiple Records in the Antiques Barn Catalog Page
In this exercise, you build the catalog page further by displaying multiple records. You also add navigation controls so that visitors can move between records easily.
-
Open catalog.jsp, if it isn't already open.
-
You want the table row containing your dynamic elements to repeat. Select that row. (Drag across the cells, or click inside a cell and use the tag selector to select the <tr> tag. It's important to make sure you get exactly the right table parts selected!)
-
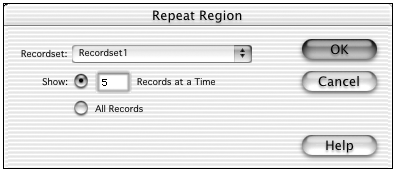
From the Application tab of the Insert bar, choose the Repeated Region object. The Repeat Region dialog box will appear, asking you which recordset to base the repeats on (you have only one recordset, so there's nothing to choose here) and how many records to show. Set the number of displayed records to 5 and click OK (see Figure 31.29).
Figure 31.29. Inserting a repeating region that will display five records at a time.
Note how the Design view display has changed to indicate the repeated region.
-
Preview your work in the browser. There are the first five records of your recordset!
-
This is great as far as it goes, but the visitor can never go beyond those first five records. You need some navigation controls. Back in Dreamweaver, the new elements should be added below the repeated elements but above the bottom navigation bar.
You need to add a new table row for the controls. Be careful here! If you place the insertion point in the table row that contains the dynamic elements, and insert a new row below it, Dreamweaver will assume that you want the new row to be part of the repeated region. Instead, you must position the cursor in the empty table row directly above the navigation bar and insert a row above. You'll have to be sneaky doing this, because that "empty" row is actually filled with transparent GIF images. Select one of the images. Then use the tag selector to choose the parent <td> tag. Then go to Modify > Table > Insert Row. (Unless you're very accurate with your mouse-clicks, it's easier to choose the menu from the menu bar than to right-click to access the contextual menu.)
You want the new navigation elements to stretch all the way across the layout, so select all three cells in the new row and merge them (Modify > Table > Merge Cells).
-
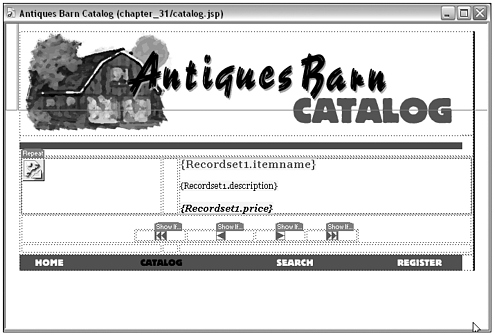
With the insertion point in the new merged row, choose the Recordset Navigation Bar from the Insert > Application bar. In the dialog box that appears, choose to use image navigation elements and click OK. The resulting insertion is shown in Figure 31.30.
Figure 31.30. The Recordset Navigation Bar being inserted in the Antiques Barn catalog page.
-
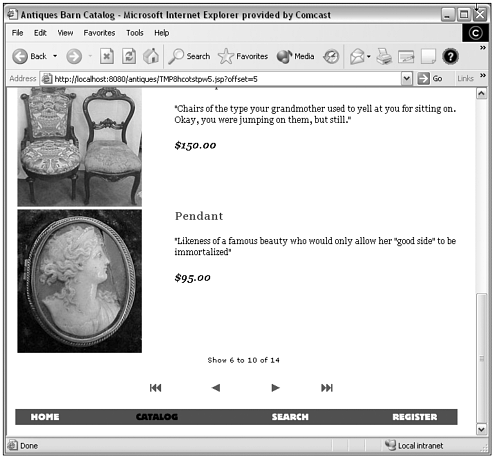
Preview your page in the browser again, and you'll see the navigation controls at work. You can click to move forward and back through pages of displayed records. Also note that the controls appear only if there are records to view you can't go to previous or first if you're at the first page already, for instance (see Figure 31.31).
Figure 31.31. The Antiques Barn catalog page with all recordset navigation elements in place.
Note

Oops! If you inserted your new table row inside the repeating region, you'll get navigation controls after every single record. There is no easy fix for this, unless you're willing to tinker around in the code. The quickest solution is to Edit > Undo, or use the History panel, backing up to before you inserted the new table row and start again.
-
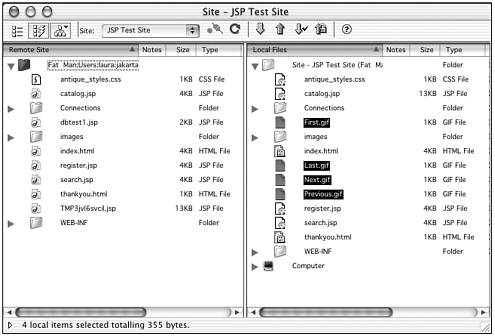
The newly inserted elements are consistent with linked images within a nested table. If you examine your Site panel, you'll see that the image files first.gif, last.gif, next.gif, and previous.gif have been added to the root level of your site. You can move these image files to your images folder, if you like but be sure to let Dreamweaver update all links when you do this (see Figure 31.32)!
Figure 31.32. The images for the Recordset Navigation control moved to the site's images folder.
-
Finally, you can make your catalog page complete by letting visitors know where they are in the recordset ("Records 1 to 5 of 10"). For the Antiques Barn page, you'll add that information directly above the recordset navigation controls.
Start by adding a new row at the top of the nested table that contains the recordset navigation. As long as you're working with this table, you're well outside the repeated region, so you don't have to worry about that.
-
Merge the cells of the new row so that it stretches across the entire table. Then, with the insertion point inside the new row, choose the Recordset Navigation Status object from the Application tab of the Insert bar. There's your new dynamic text (see Figure 31.33).
Figure 31.33. The Recordset Navigation Status object inserted.
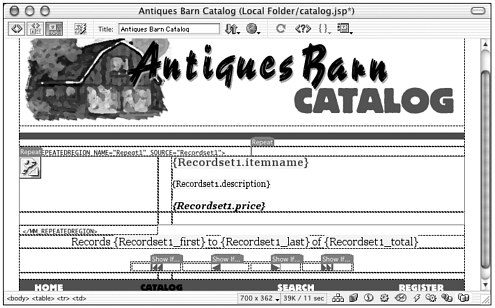
-
Preview in the browser, to see it in action.
As with any dynamic text element, you can format the status line as you like. You also can change any of the static text, so long as you don't disturb the placeholder text. (In Figure 31.31, for instance, the word records has been changed to show.)
Congratulations! The Antiques Barn catalog page is now complete. You've built your first JSP web application document.
Summary
In this chapter, you learned the basics of setting up a JSP site in Dreamweaver and creating a page that displays dynamic elements. Although you can't experience the full power of JSP without learning some Java programming, Dreamweaver provides even Java newbies the necessary tools to build a basic JSP site.
| CONTENTS |
EAN: 2147483647
Pages: 49