65. Create and Save a Preset  BEFORE YOU BEGIN BEFORE YOU BEGIN
58 About Preset Effects 61 Add and Customize an Effect 68 About the Properties Panel
 SEE ALSO SEE ALSO
67 About Keyframing 69 Add Motion to a Still 70 Pan and Zoom Still Images a la Ken Burns 75 Control a Video Effect with Keyframes
If you like the effects and motions you've applied to a clip, you can save each effect as your own, custom preset, so you can easily recall it in this and future projects. 1. | Customize an Effect's Settings on a Clip
Browse the Effects and Transitions panel for an effect. As you open each collection, look at the thumbnails to see a sample of each effect. If you click to select a Motion or Transitional effect, the thumbnail displays an animated preview.
When you've found an effect you want to use, drag it onto a clip on the Timeline.
 NOTE NOTE
Although you can add as many effects as you'd like to any clip, you can save a preset for only one effect or motion at a time. With the clip selected on the Timeline, customize the effect you've applied in the Properties panel as described in 61 Add and Customize an Effect.
For this example, I applied the Camera View effect (from the Video FX Transform collection). I set the Focal Length to 500, the Distance to 500, and Latitude to 100essentially making my initial screen image appear to be rotated facing down in three-dimensional space, a long distance from the camera.
| 2. | Add Motion
If you'd like, you can add keyframed motion to your effect either by starting from a preset motion effect or by creating custom movement from scratch (as described in 69 Add Motion to a Still and 70 Pan and Zoom Still Images a la Ken Burns).
65. Create and Save a Preset 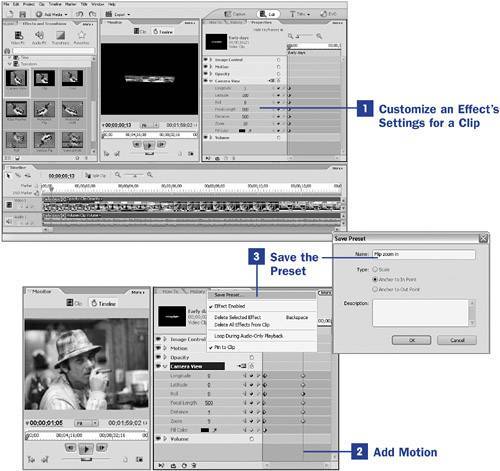
In my example, I clicked the Show Keyframes button at the top of the Properties panel and then clicked the stopwatch icon to the right of the Camera View listing in the Properties panel, which set my first set of keyframes. Then I moved the current time indicator (CTI) in the Properties panel one second to the right and changed my effect's Longitude, Latitude, Distance, and Zoom settings so the image filled the screenautomatically creating a new set of keyframe points in which my screen image is now a normal, full-screen clip.
Move the CTI back to the beginning of your clip and render the affected clip by pressing the Enter key.
NOTE After you apply an effect to a clip, press the Enter key to render it. Rendering creates a clean-looking, final version of the modified clip and motion path, improving your playback quality immensely and saving your computer the taxing work of having to re-create a preview of your affected clip on the fly. In my example, the image zooms into full screen as it appears to rotate up in three-dimensional space toward the camera.
| 3. | Save the Preset
Click the effect in the Properties panel whose settings or motion path you'd like to save (in this case, the Camera View effect) and then click the More button. From the menu, select Save Preset. The Save Preset dialog box opens.
You'll be asked to name your preset. You'll also have the option of beginning any change in the effect or motion path at the clip's In or Out point.
Your new preset is added to the My Presets collection in the Effects and Transitions panel. You can apply it to any other clips in the current projector to clips in any other projectby dragging it from the Effects and Transitions panel and dropping it on the desired clip, just as you would any of Premiere Elements' standard presets.
If you later decide you want to remove this custom preset from your collection, right-click it in the Effects and Transitions panel and select the Clear option from the context menu.
|
|