10.4. Emulating the Mac So far, this chapter has covered getting other operating systems to run on your Mac, but you can also go in the other direction, running Mac OS X on other operating systems. 10.4.1. PearPC PearPC (http://pearpc.sourceforge.net) emulates a Macintosh surprisingly well, and runs on Linux and Windows. At the time of this writing, PearPC isn't quite ready for daily use, but it certainly makes a great conversation piece at parties, assuming that you throw or attend the kind of parties where geeks gather around computers.  | PearPC is quite complicated to set up. You'll need to tweak a configuration file a few times during installation, use Darwin for PowerPC to partition the virtual hard drive, and perform some manual steps to get networking going. |
|
First, download PearPC from http://pearpc.sourceforge.net, install it, then follow the instructions in the rest of this section. To create and partition your virtual drive image: Use the dd command to create a blank image. The seek option lets you specify a size without actually writing the data. Be sure to use a block size of 516,096, as this is what PearPC expects. You can specify a size in gigabytes as a multiple of 2080: $ dd if=/dev/zero of=macosxpanther.img bs=516096 \ seek="expr 2080 \* 4" count=0
Make sure you have a Darwin ISO handy (we used darwin-701.iso, which you can get from http://devworld.apple.com/darwin). Create a configuration file for booting Darwin, with the filename ppccfg.darwin_bootstrap and these contents: prom_env_machargs="-v" # Hard disk pci_ide0_master_installed=1 pci_ide0_master_image="macosxpanther.img" pci_ide0_master_type="hd" # boot cd pci_ide0_slave_installed=1 pci_ide0_slave_image="darwin-701.iso" pci_ide0_slave_type="cdrom"
Boot PearPC with the following command, and then select the CD as the boot device when prompted: ppc ppccfg.darwin_bootstrap
When Darwin's installer boots, don't choose to install Darwin. Instead, type shell and press Return to drop into a shell. Run pdisk and select /dev/disk0 as the disk to operate on. Create a new Apple_HFS partition with a starting block of 64 and a length in blocks equal to the size of the Apple_Free partition as shown in Figure 10-9. (Use w to write your changes and q to exit pdisk.) Type halt to shut down Darwin.
Figure 10-9. Partitioning your virtual disk 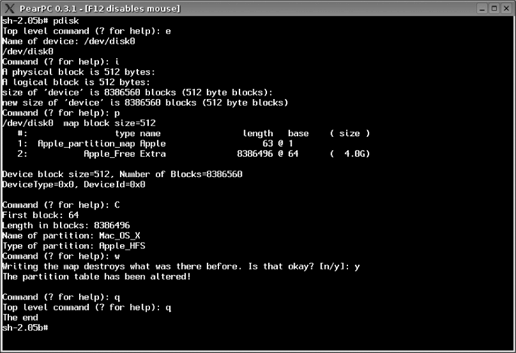
To install Mac OS X: Copy the video.x graphics driver into the directory that holds your virtual drive: $ cp .. /src/pearpc-0.3.1/video.x .
Create a configuration file, ppccfg, with the following contents: prom_env_machargs="-v" prom_driver_graphic="video.x" # Hard disk pci_ide0_master_installed=1 pci_ide0_master_image="macosxpanther.img" pci_ide0_master_type="hd" # boot cd pci_ide0_slave_installed=1 pci_ide0_slave_image="/dev/cdrom" pci_ide0_slave_type="cdrom"
Insert your Mac OS X installation CD in your CDROM drive, and run the command ppc ppccfg. You'll be prompted to select a partition to boot. At this point, there's only one choice, as shown in Figure 10-10. Select it and the Mac OS X installer will launch. Continue through the dialogs as you would on a real Mac. When you reach the Select a Destination screen, you probably won't see any available volumes. Select Open Disk Utility from the Installer menu, and erase the virtual drive as shown in Figure 10-11. Choose the hard disk you just formatted as your destination, and click Continue to proceed to the Easy Install. To avoid disk swapping, click Customize and trim the installation choices down to the bare minimum as shown in Figure 10-12. Click Install to begin. After it's done, Mac OS X will try to reboot, but may instead just shutdown (or perhaps panic, repeating the error message "Event processing timed out. Event dropped."). You can kill PearPC if necessary. Put your second CD-ROM in the drive, and restart PearPC (with the command ppc ppccfg again). Select your hard drive when prompted to select a partition to boot (option 2 in Figure 10-13) After Mac OS X boots up, the Installer may install some more software at this point before launching the Setup Assistant. Answer the questions the Setup Assistant asks you. You should skip the Internet connection setup for now. We'll explain how to get that up and running in the next section.
Mac OS X should now be running, as shown in Figure 10-14. To configure your PearPC virtual machine to support networking: Shut down the virtual machine. Make sure your Linux kernel has support for the tun and bridge modules. If you get an error running the following two commands, you may need to rebuild your kernel: # modprobe tun # modprobe bridge
Figure 10-10. Select the installation CD to get things started 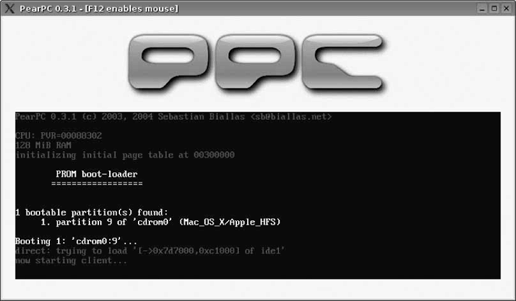
Figure 10-11. Erasing the virtual hard drive 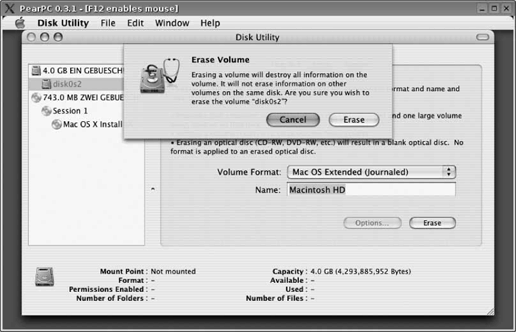
Make sure that the user under which you plan to run PearPC has access to the tun device: # chown : bjepson /dev/net/tun # chmod g+rw /dev/net/tun
Figure 10-12. Install a minimal system 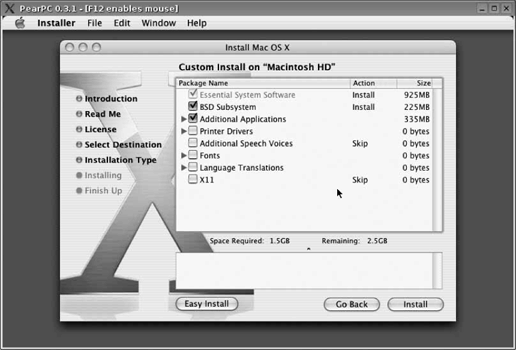
Figure 10-13. Select disk0 to boot your new Mac OS X installation 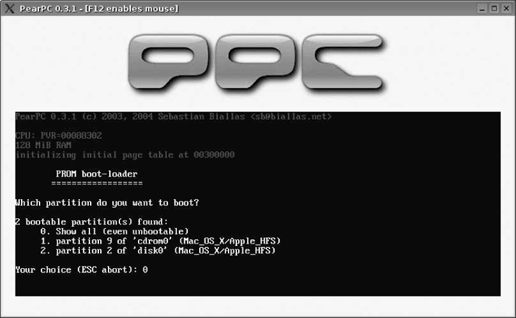
Copy the PearPC networking scripts to the same directory as the virtual machine and give yourself access to them (but make root the owner): # cp -R ~/src/pearpc-0.3.1 /scripts . # chown root: bjepson scripts/ifppc*
Figure 10-14. Mac OS X up and running under PearPC 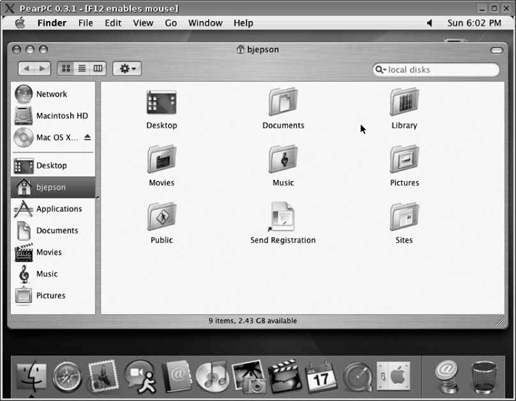
Make some of the ifppc* scripts suid root: # chmod 4755 scripts/ifppc_*setuid
Add the following lines to your config file (ppccfg in the previous example): #network pci_rtl8139_installed = 1 pci_rtl8139_mac = "de:ad:ca:fe:12:35"
Start PearPC: $ ppc ppccfg
Open System Preferences  Network. The first time you do this, Mac OS X announces that its detected a new PCI Ethernet Slot. This is the virtual Ethernet card. Select it from the Show menu, and select TCP/IP. Network. The first time you do this, Mac OS X announces that its detected a new PCI Ethernet Slot. This is the virtual Ethernet card. Select it from the Show menu, and select TCP/IP. Configure your network adapter with the IP address 192.168.1.1 and the router 192.168.1.80 as shown in Figure 10-15. Use the same DNS server as you do for the rest of your network (shown as 192.168.254.1 in this example).
Figure 10-15. Configuring the network under PearPC 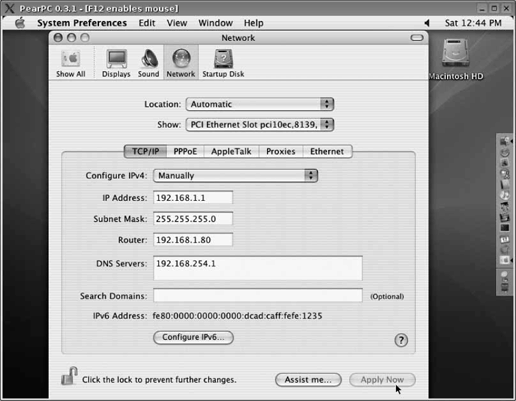
|


 Network. The first time you do this, Mac OS X announces that its detected a new PCI Ethernet Slot. This is the virtual Ethernet card. Select it from the Show menu, and select TCP/IP.